
Connect CodeScene MCP
Early access
This is early access functionality. Contact your account executive to get access.
Connect your AI assistant to CodeScene in three steps: find the server address, add it to your assistant, and approve the access. You sign in with your CodeScene account in your browser, so you don’t need a token.
The assistant can read the analysis of the projects you can open in CodeScene. It cannot change projects, settings, or code. When it is connected, continue with CodeScene MCP: Explore Your Insights.
Step 1: Find the server address
The server address is your CodeScene Host URL followed by /mcp:
In CodeScene, open Configuration → System.
Under Host/Network Settings, copy CodeScene Host URL.
Add
/mcpat the end.https://codescene.example.combecomeshttps://codescene.example.com/mcp, andhttps://example.com/codescenebecomeshttps://example.com/codescene/mcp.
Use exactly this host name. Other names for the same server, such as its IP address, are refused at sign-in.
Step 2: Add CodeScene to your assistant
Follow the steps for your assistant, and replace <server address> with the address from step 1.
Claude
For Claude on the web, desktop, and mobile. Needs a paid plan. On Team and Enterprise plans, an owner may have to add the connector first.
Needs an internet-facing server
Claude connects from its own servers, so your CodeScene Host URL has to be reachable from the internet.
Open Settings → Connectors and choose Add custom connector.
Enter the name
CodeSceneand the server address<server address>. Leave the advanced settings empty.Click Connect, then continue with step 3.
In a chat, turn on CodeScene from the tools menu.
ChatGPT
Needs a paid plan. In Business and Enterprise workspaces, an admin may have to allow developer mode.
Needs an internet-facing server
ChatGPT connects from its own servers, so your CodeScene Host URL has to be reachable from the internet.
Open Settings → Apps & Connectors → Advanced settings and turn on Developer mode.
Back in Apps & Connectors, choose Create.
Enter the name
CodeSceneand the server address<server address>, and choose OAuth.Click Create, then continue with step 3.
In a chat, add CodeScene from the + menu.
Claude Code
Claude Code connects from your computer, so it works wherever your browser reaches CodeScene.
In a terminal, run:
claude mcp add --transport http --scope user codescene <server address>
Start
claude, type/mcp, selectcodescene, and choose Authenticate. Continue with step 3.
Codex
For the Codex CLI and the IDE extension.
Codex connects from your computer, so it works wherever your browser reaches CodeScene.
In a terminal, run:
 codex mcp add codescene --url <server address>
 codex mcp login codescene
Continue with step 3.
GitHub Copilot
You can use Copilot in VS Code or in the terminal with the Copilot CLI. We recommend VS Code: CodeScene allows it by default, and it guides you through the sign-in.
Each has its own configuration file, and the formats differ: VS Code uses servers, the Copilot CLI uses mcpServers. Follow the steps for the one you use.
Both connect from your computer, so they work wherever your browser reaches CodeScene.
VS Code (recommended)
Open the Command Palette and run MCP: Open User Configuration. This opens
mcp.json.Add the server under
servers:{ "servers": { "codescene": { "type": "http", "url": "<server address>" } } }
Click Start above the server entry and allow the sign-in. Continue with step 3.
In Copilot chat, switch to Agent mode. The CodeScene tools are in the tools picker.
Copilot CLI
Add the server under
mcpServersin~/.copilot/mcp-config.json:{ "mcpServers": { "codescene": { "type": "http", "url": "<server address>" } } }
Or run
/mcp addincopilotand enter the same name, type, and address.Start
copilot. It opens CodeScene in your browser. Continue with step 3.If CodeScene says the assistant is not allowed, see If your assistant is not allowed.
Cursor
Cursor connects from your computer, so it works wherever your browser reaches CodeScene.
Open Cursor Settings → MCP & Integrations and choose Add Custom MCP.
Add the server to
~/.cursor/mcp.json, including the client id:{ "mcpServers": { "codescene": { "url": "<server address>", "auth": { "CLIENT_ID": "cs-remote-mcp", "scopes": ["remote-mcp.read"] } } } }
Click Connect next to
codescene. Continue with step 3.
Use the file in your home directory
A .cursor/mcp.json inside a project can hide the server from the agent. The connection then works once and shows as disconnected afterwards.
Kiro
For the Kiro IDE and the Kiro CLI, which share one configuration file.
Kiro connects from your computer, so it works wherever your browser reaches CodeScene.
Add the server to
~/.kiro/settings/mcp.json, including the client id and the callback address:{ "mcpServers": { "codescene": { "url": "<server address>", "oauthScopes": ["remote-mcp.read"], "oauth": { "clientId": "cs-remote-mcp", "redirectUri": "http://127.0.0.1:33420/callback" } } } }
If port
33420is in use on your computer, pick another port, but keep the path/callback.Save the file. In the Kiro panel,
codesceneshows as Unauthenticated under MCP Servers. Click Authenticate. Kiro opens CodeScene in your browser. Continue with step 3.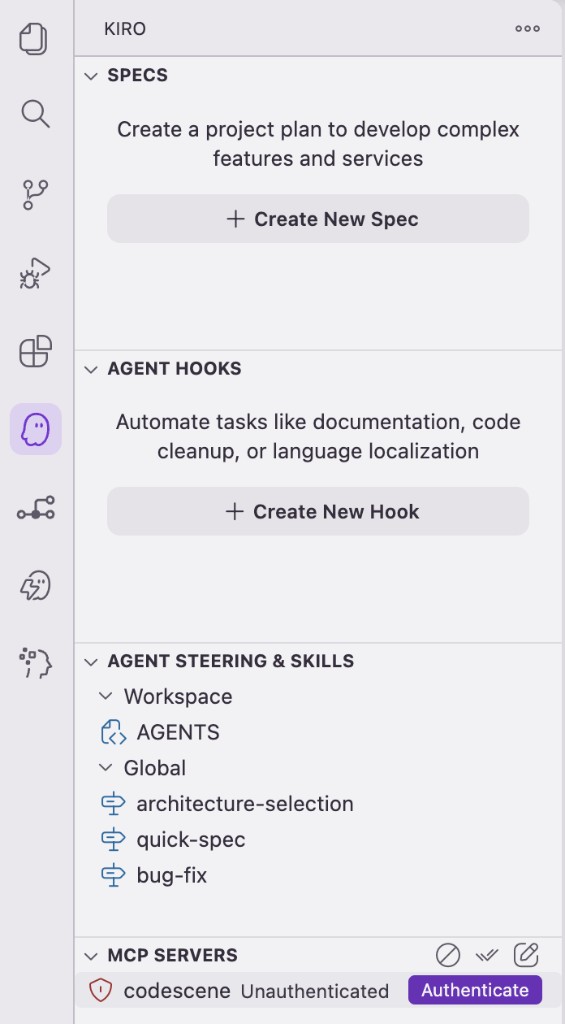
Other assistants
Other assistants can connect if they support remote MCP servers with OAuth sign-in. Add the server address <server address>. If CodeScene says the assistant is not allowed, see If your assistant is not allowed.
Step 3: Approve the access
The assistant opens CodeScene in your browser. Sign in if you are not already.
CodeScene shows which assistant is asking for access. If it’s the one you’re connecting, choose Approve.
To check the connection, ask the assistant: Which CodeScene projects can I see?
CodeScene remembers the approval. To disconnect, revoke it in Manage OAuth2 Authorizations and remove the server from the assistant.
Troubleshooting
What you see |
What to do |
|---|---|
“Not found” when you add the server |
CodeScene is not turned on for your account or server yet. Contact your account executive to get access. |
CodeScene says the assistant is not allowed |
|
The assistant finds no projects |
It sees only the projects you can open in CodeScene. Check that you approved the account that has them. |
The assistant says the analysis needs to be run again |
Run a new analysis of the project. |
The connection worked, then stopped |
The access was revoked, or an admin removed the assistant from the allowed list. Connect again, or ask your admin. |
If Claude or ChatGPT cannot reach the server, your CodeScene Host URL is not reachable from the internet. Use Claude Code, Codex, GitHub Copilot, Cursor, or Kiro instead.
If GitHub Copilot cannot connect but other assistants can, your server may only allow TLS 1.3, which Copilot doesn’t support yet. Turn on TLS 1.2 where HTTPS is set up for CodeScene, such as your reverse proxy or load balancer.
If your assistant is not allowed
CodeScene only lets known assistants sign in. Claude, Claude Code, ChatGPT, Codex, and VS Code are allowed by default. For other assistants, try these in order:
Set a client id. If the assistant lets you set an OAuth client id, use
cs-remote-mcpwith the scoperemote-mcp.read, as in the Cursor and Kiro steps. If you can also set the callback address, usehttp://127.0.0.1:<port>/callback. This only works for assistants that run on your computer, not for web apps.Ask an admin to allow it, as described below.
Contact CodeScene support with the assistant’s name. Widely used assistants are added to the defaults.
For administrators
Allow an assistant
Each assistant identifies itself with the web address of a description document. You find it in the assistant’s documentation, or in the client_id parameter in the address of the failed sign-in page. The defaults are:
Assistant |
Identified as |
|---|---|
Claude |
|
Claude Code |
|
ChatGPT |
|
Codex |
|
VS Code |
|
Allow another assistant with a personal access token that has write scope. $CODESCENE_URL is https://codescene.io on CodeScene Cloud, and the CodeScene Host URL on your own server.
curl -X POST \
  -H "Authorization: Bearer $CODESCENE_TOKEN" \
  -H "Content-Type: application/json" \
  -d '{"clientId": "https://assistant.example.com/oauth/client.json"}' \
  "$CODESCENE_URL/api/account/config/mcp/clients"
If CodeScene cannot fetch the description document, for example without outbound HTTPS or behind a proxy, send the document itself as metadata in the same request. The defaults work without outbound access.
Removing an assistant from the list stops new sign-ins at once. Users who are already connected keep access for up to an hour, until their sign-in expires. To end a user’s access at once, delete the grant at /api/account/config/mcp/grants with the user’s id and the assistant’s client id.