Code Coverage
Visualize code coverage in CodeScene
Code coverage is a set of metrics that shows how much of your source code gets executed by automated tests. There is no such thing as a “good” coverage score – it all depends on context. For example, in a critical hotspot, you need a higher degree of coverage to refactor safely, whereas you can get away with lower coverage in stable and well-understood parts of the codebase. CodeScene provides those priorities to put coverage metrics into context.
The typical use cases are:
Prepare for refactoring: identify feature areas with low coverage before planning refactoring tasks. For example, refactoring a complex hotspot that doesn’t have adequate code coverage would be high risk.
Mitigate risk: identify complex hotspots that don’t have sufficient code coverage and plan to improve.
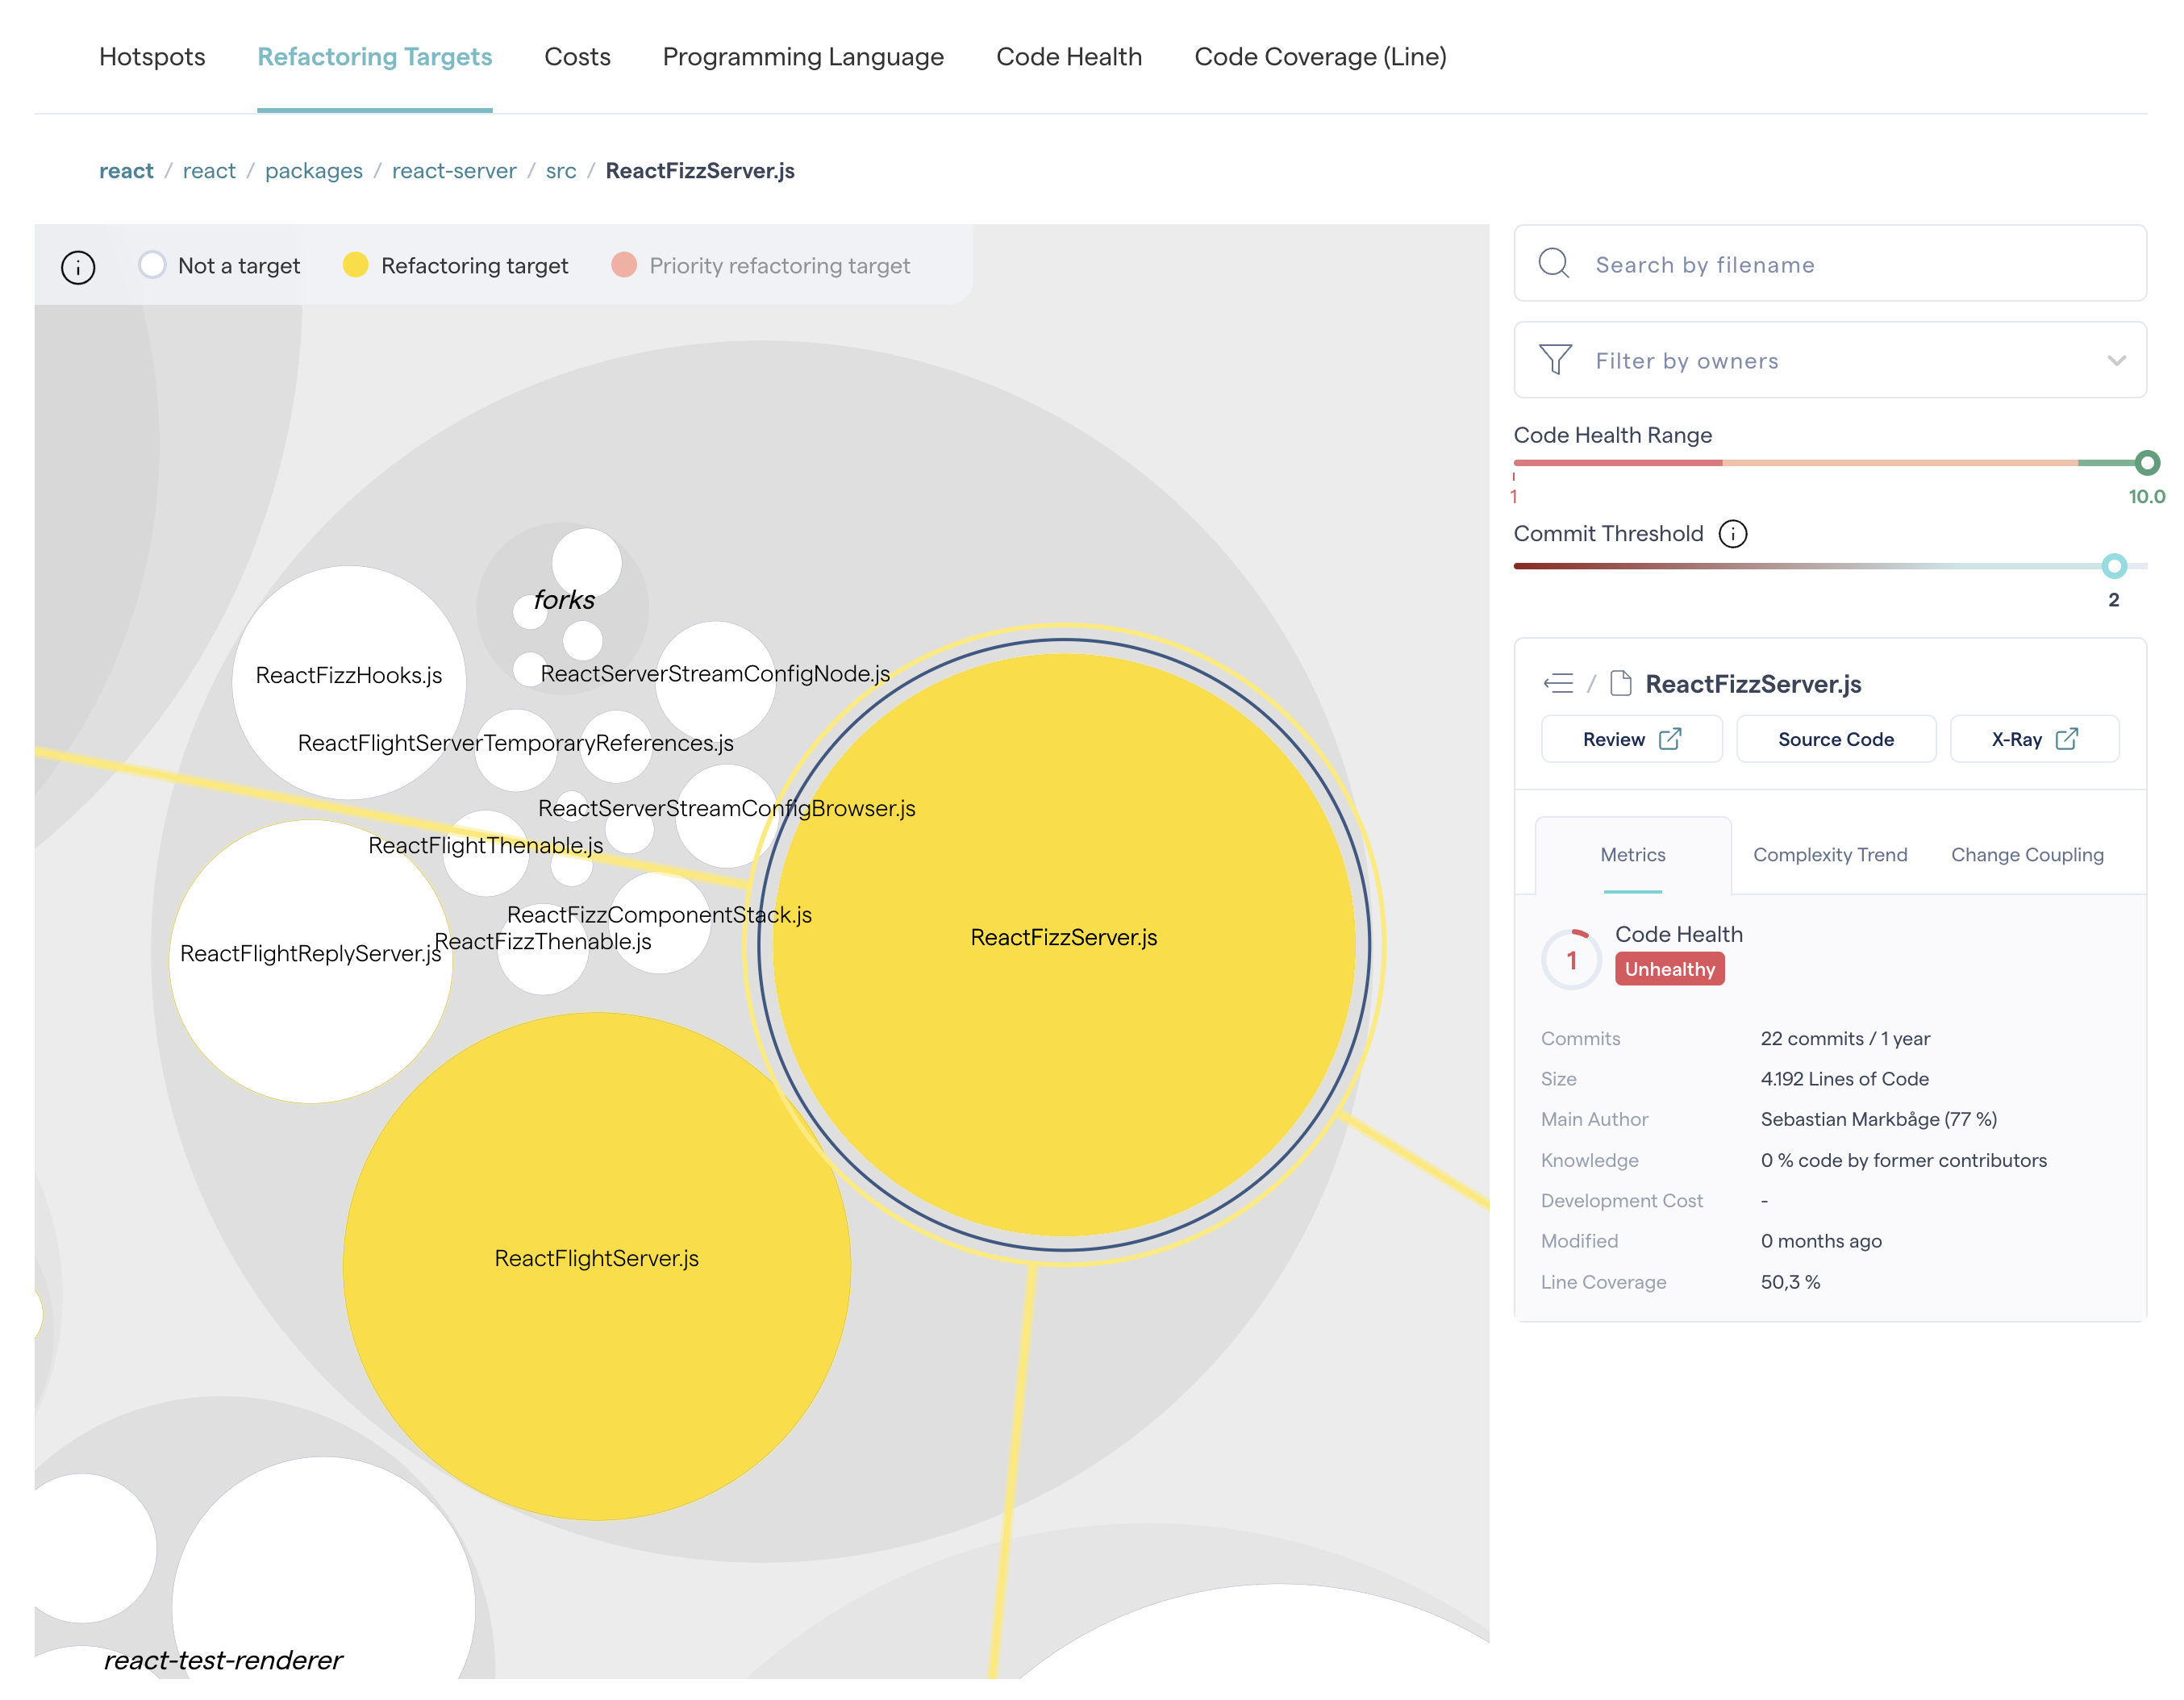
Fig. 68 Refactoring Targets also show code coverage scores to help you evaluate the risk before refactoring.
Code Coverage Metrics
There are multiple code coverage metrics, and the most popular are:
Line coverage: which lines of code have been covered by automated tests?
Branch coverage: which execution paths have been covered by automated tests? For example, a line of code like if a && b can have full line coverage, but only partial branch coverage.

Fig. 69 CodeScene visualizes code coverage in its interactive views. The green nodes signify high code coverage, while red nodes represent low code coverage.
Using Code Coverage in CodeScene
If code coverage data has been uploaded for a project, you will find a new tab labeled Code Coverage in the interactive hotspots map under Code → Hotspots.
To view the project’s total average code coverage score, click on the top-level circle in the interactive hotspots map and open the Summary tab located in the lower right corner.
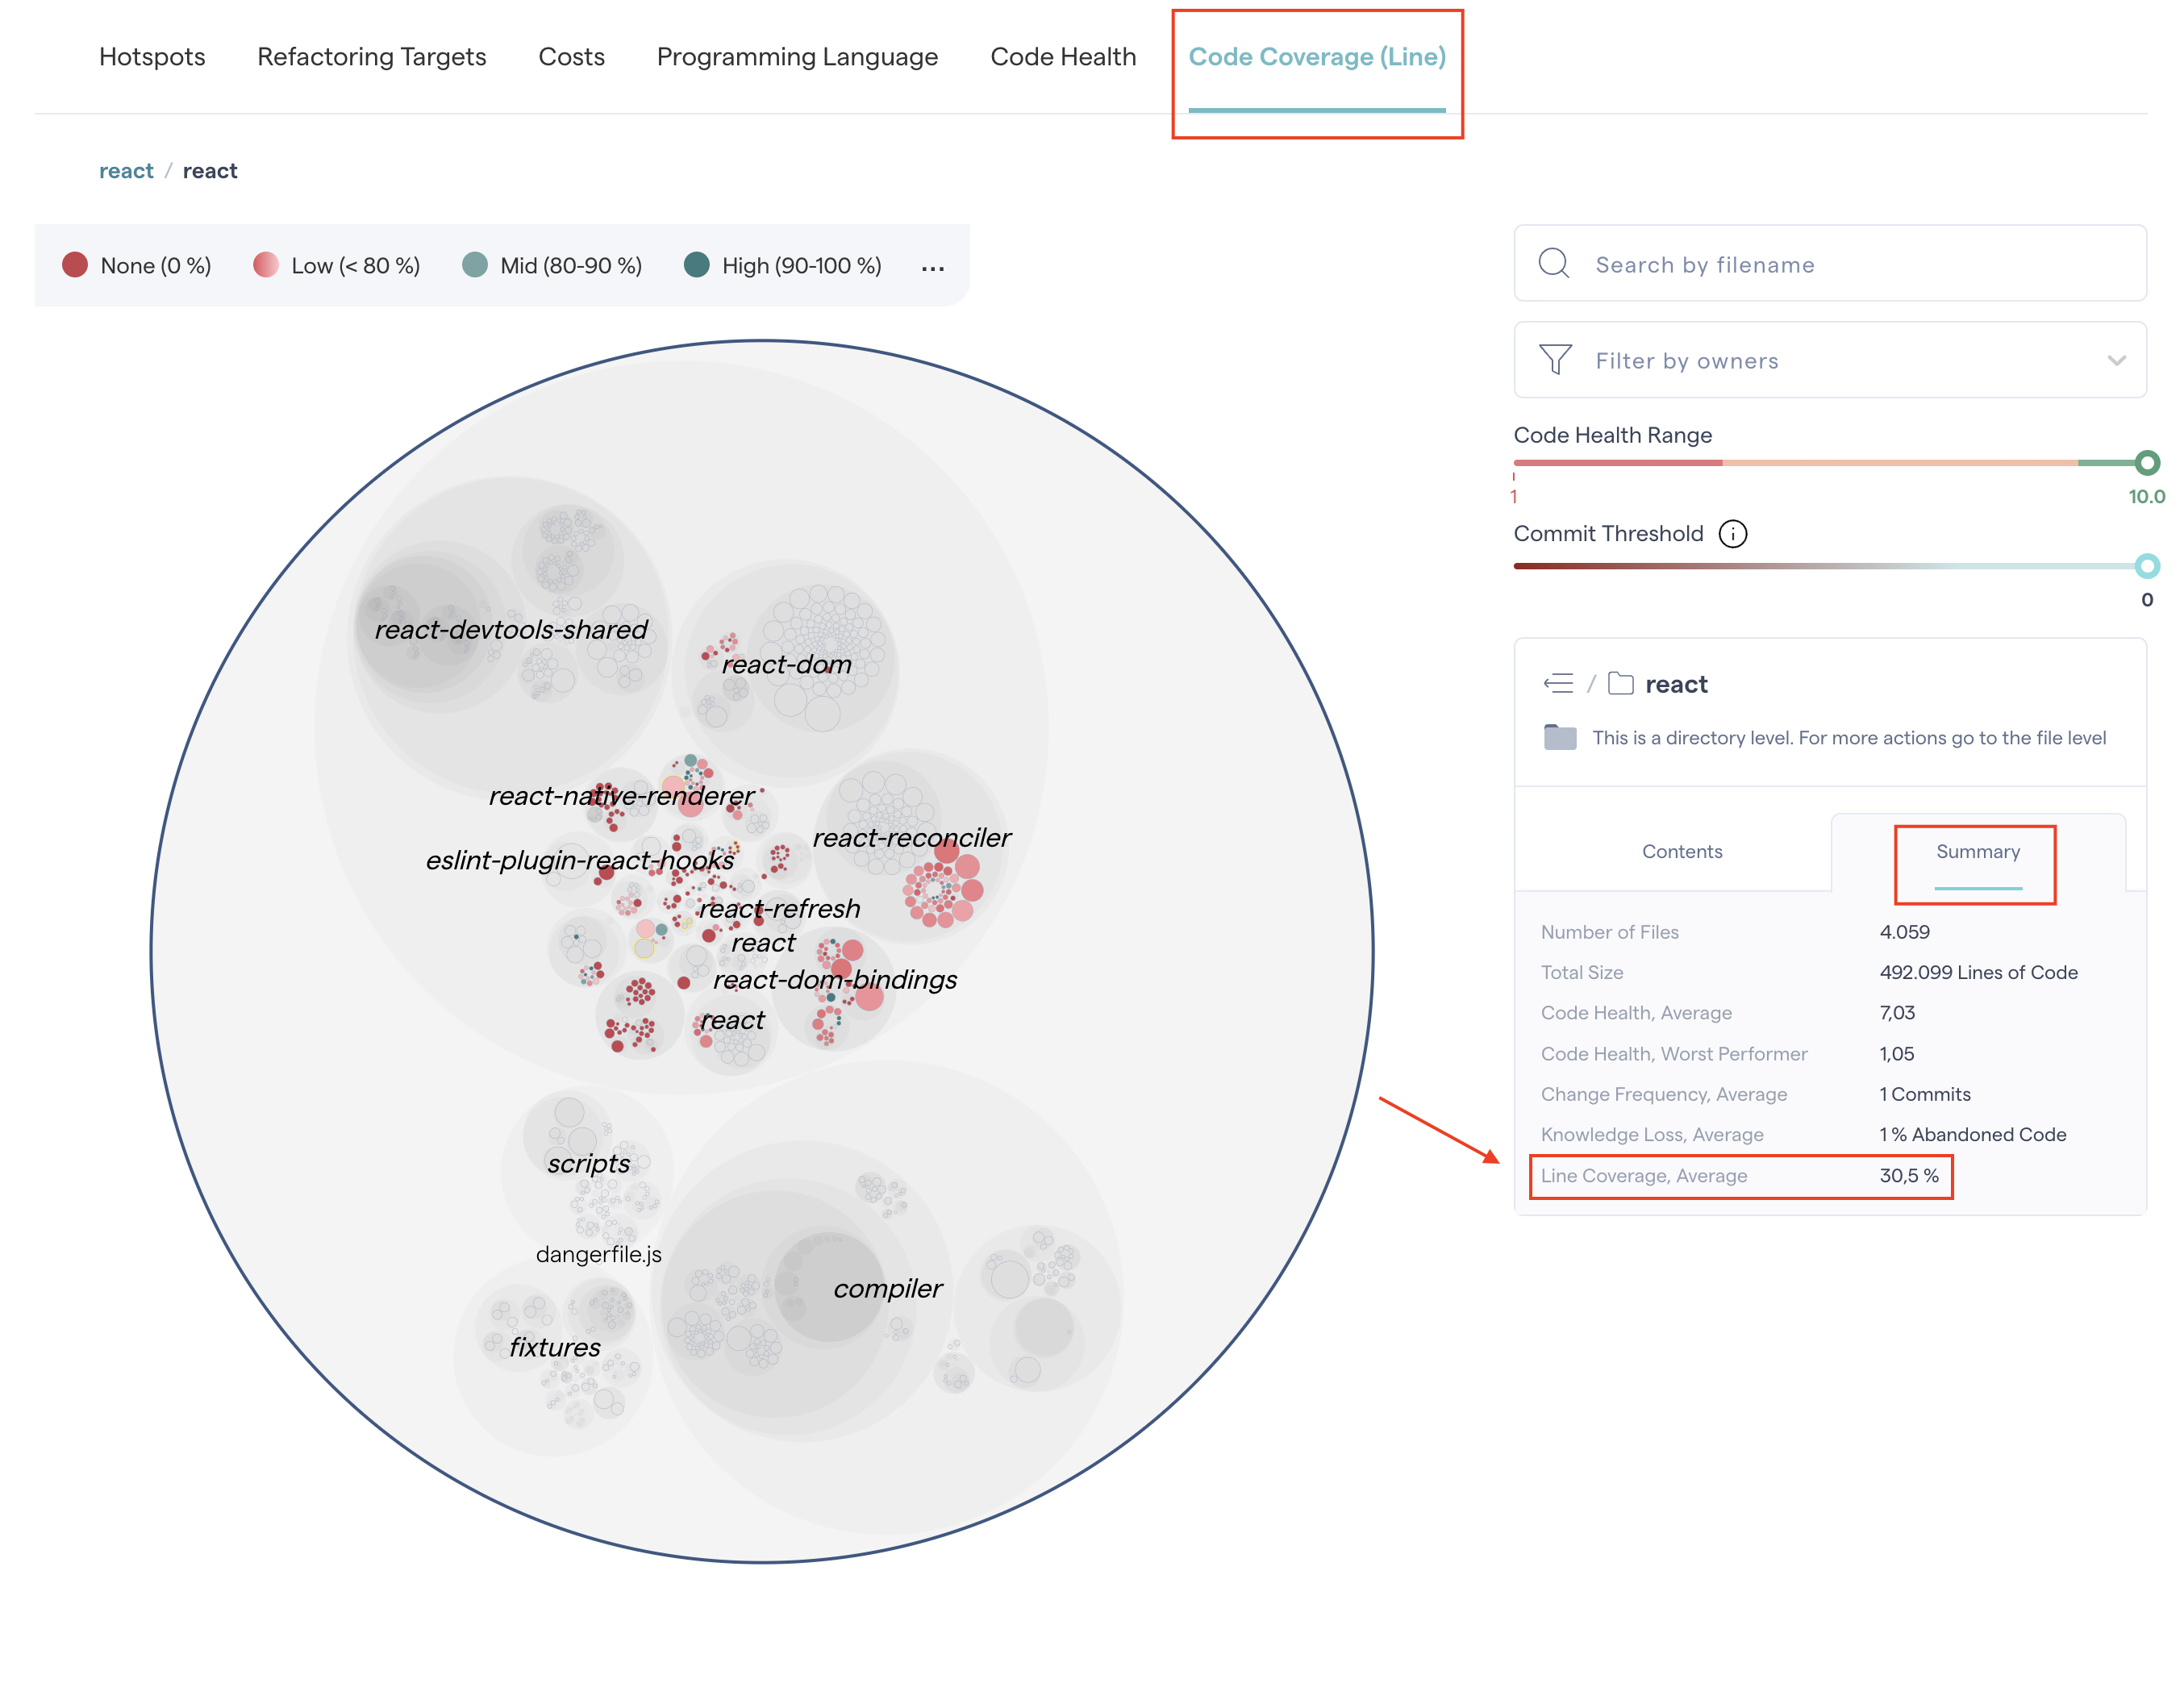
Fig. 70 The average code coverage of a selected project, or a specific part of it, is available in the Summary tab.
Clicking on specific folders reveals the average code coverage score for all the files within the folder. The same applies for a specific file to reveal its detailed metric (e.g. Line coverage: 85%).
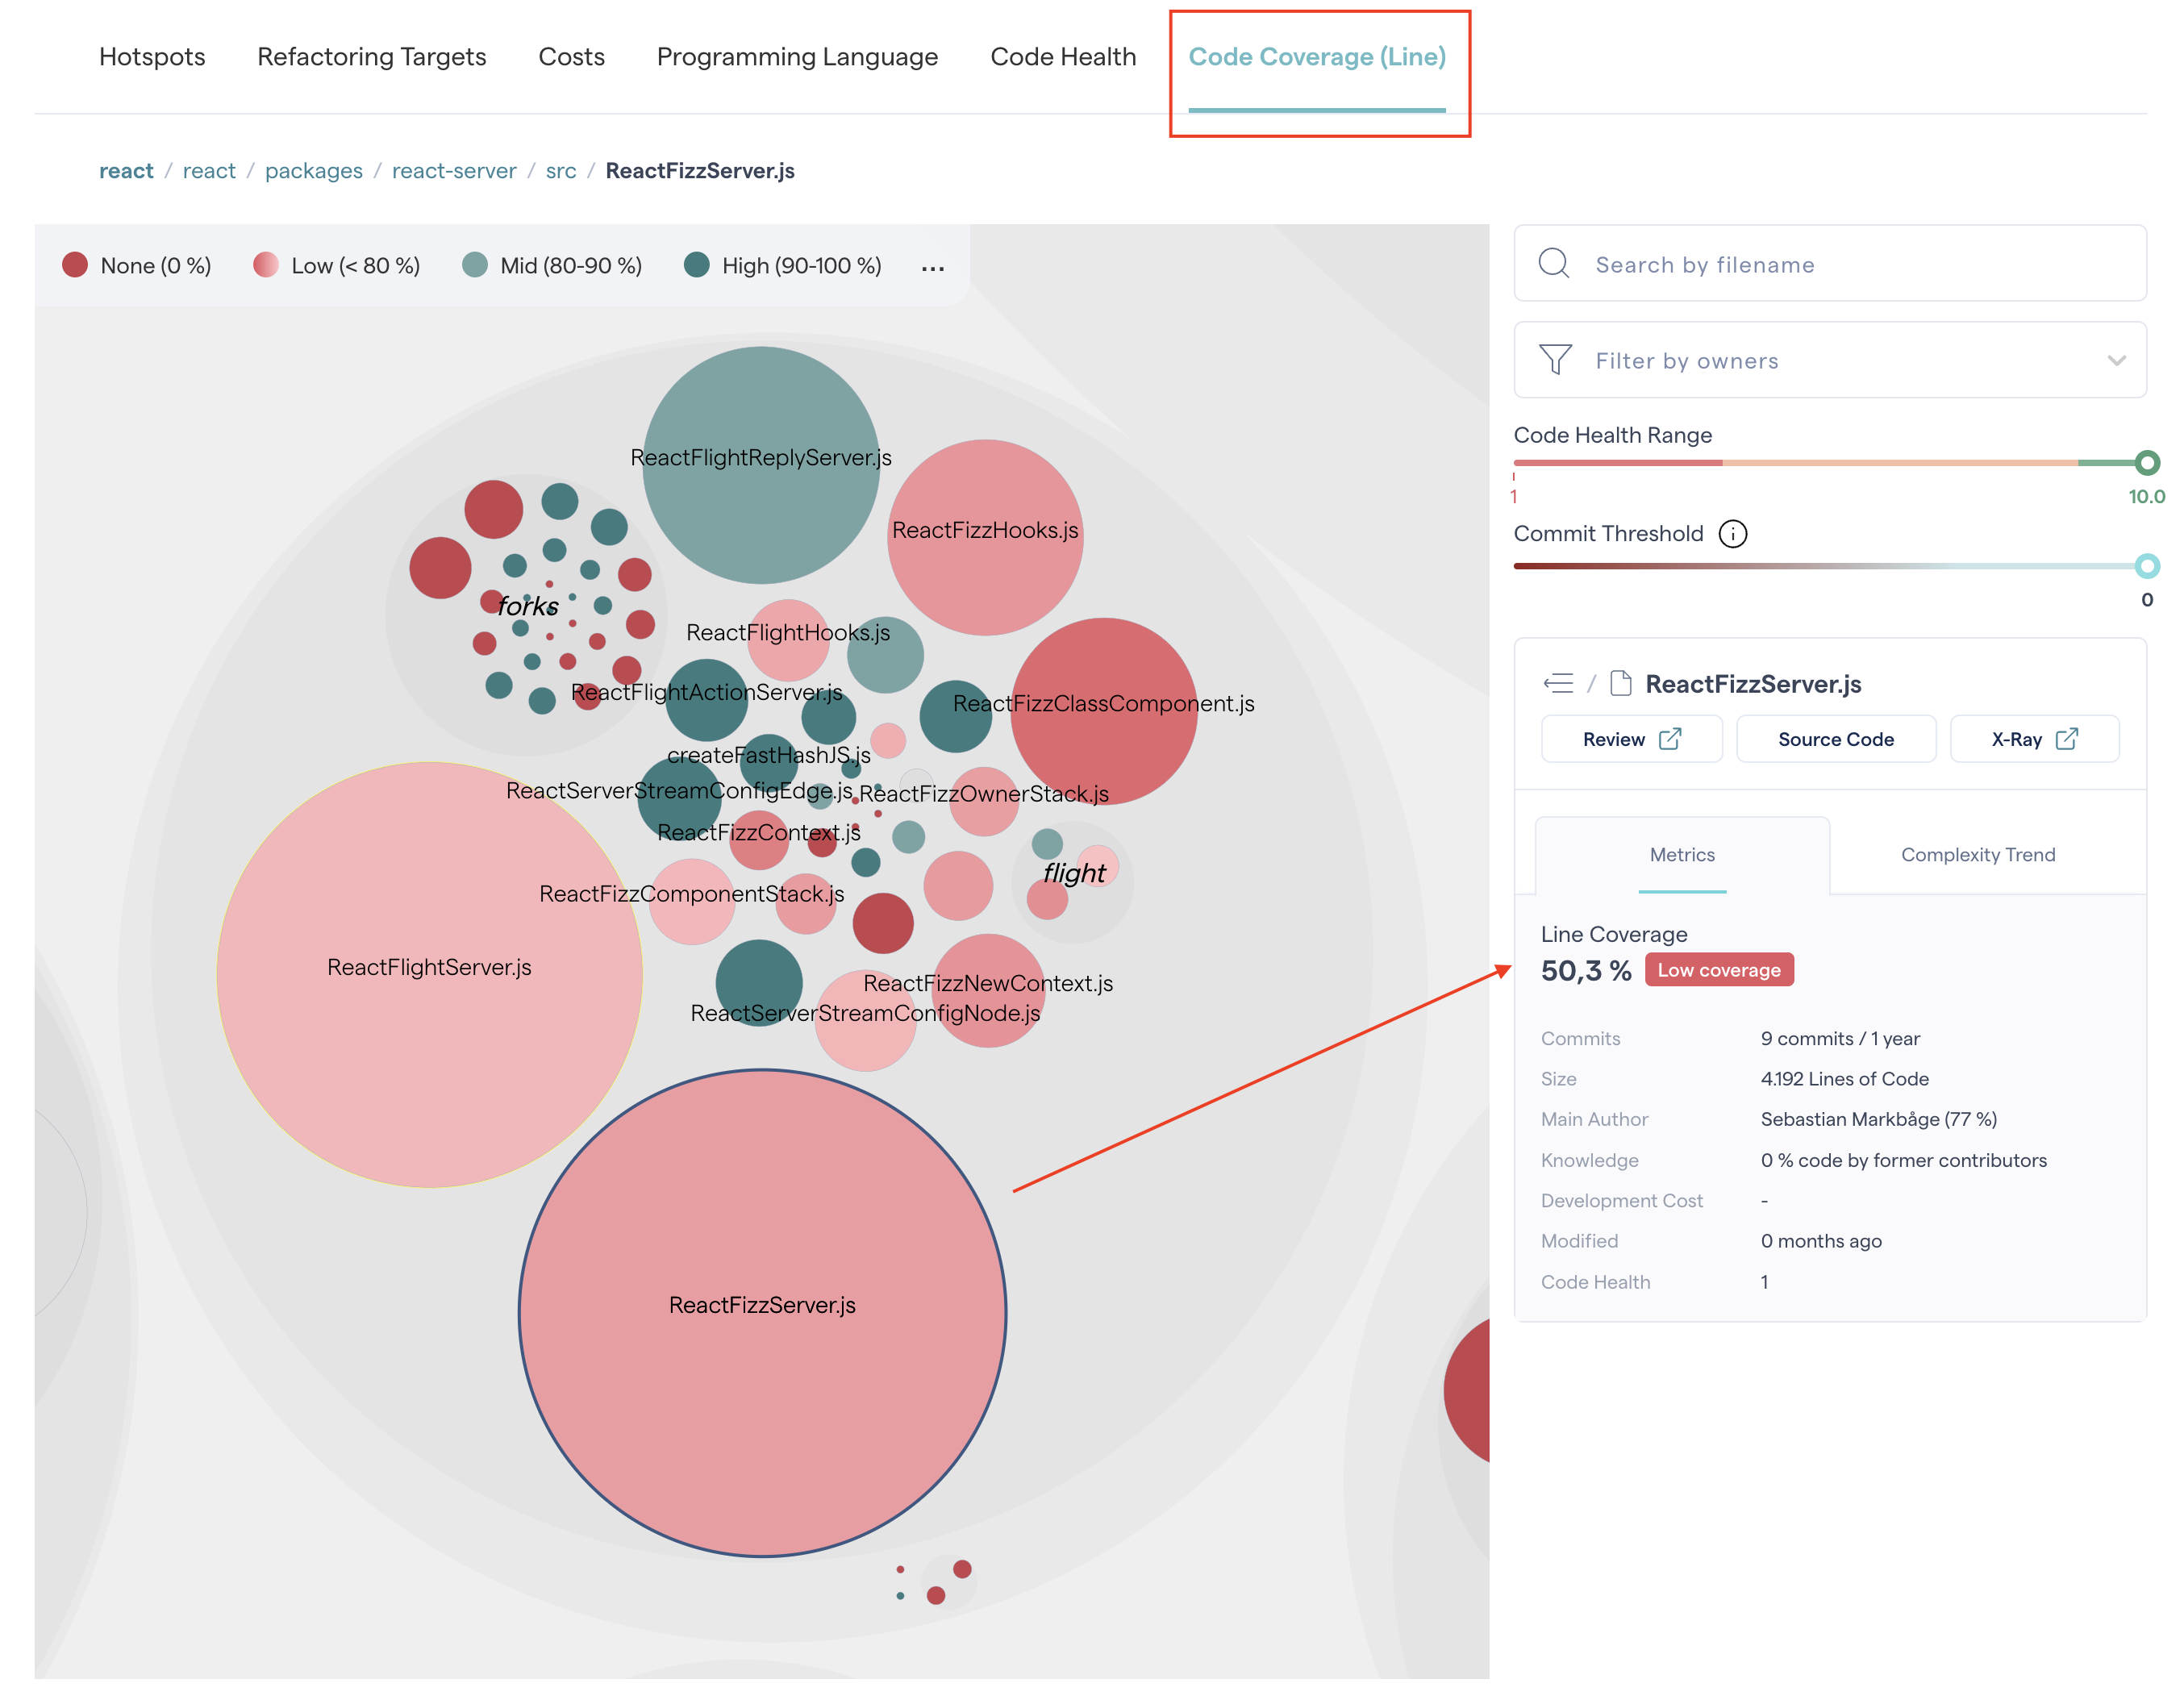
Fig. 71 An example of a line coverage score for a file.
Getting started with Code Coverage in CodeScene
CodeScene does not generate code coverage data itself but provides a platform to visualize and explore your project’s results. Code coverage data can be produced using various tools that are typically language-specific. These tools generate coverage data in different file formats. Ensure that the tool you choose outputs coverage data in a format supported by CodeScene.
Supported formats and metrics
CodeScene’s code coverage solution supports multiple coverage tools and formats.
Format |
Metrics |
|---|---|
|
line-coveragebranch-coverage |
|
|
|
line-coveragebranch-coverage |
|
sequence-point-coveragemethod-coveragebranch-coverage |
|
method-coveragecondition-coveragestatement-coverage |
|
|
|
|
|
method-coveragecondition-decision-coveragedecision-coverage |
You can add multiple coverage metrics for one repo, and each of them will show up as a separate tab on the interactive hotspot map.
Uploading Code Coverage Data to CodeScene
The result files generated by these tools as part of a build pipeline are uploaded to CodeScene via the API. The API also support triggering a new analysis of the project to make sure CodeScene has used the latest code coverage data.
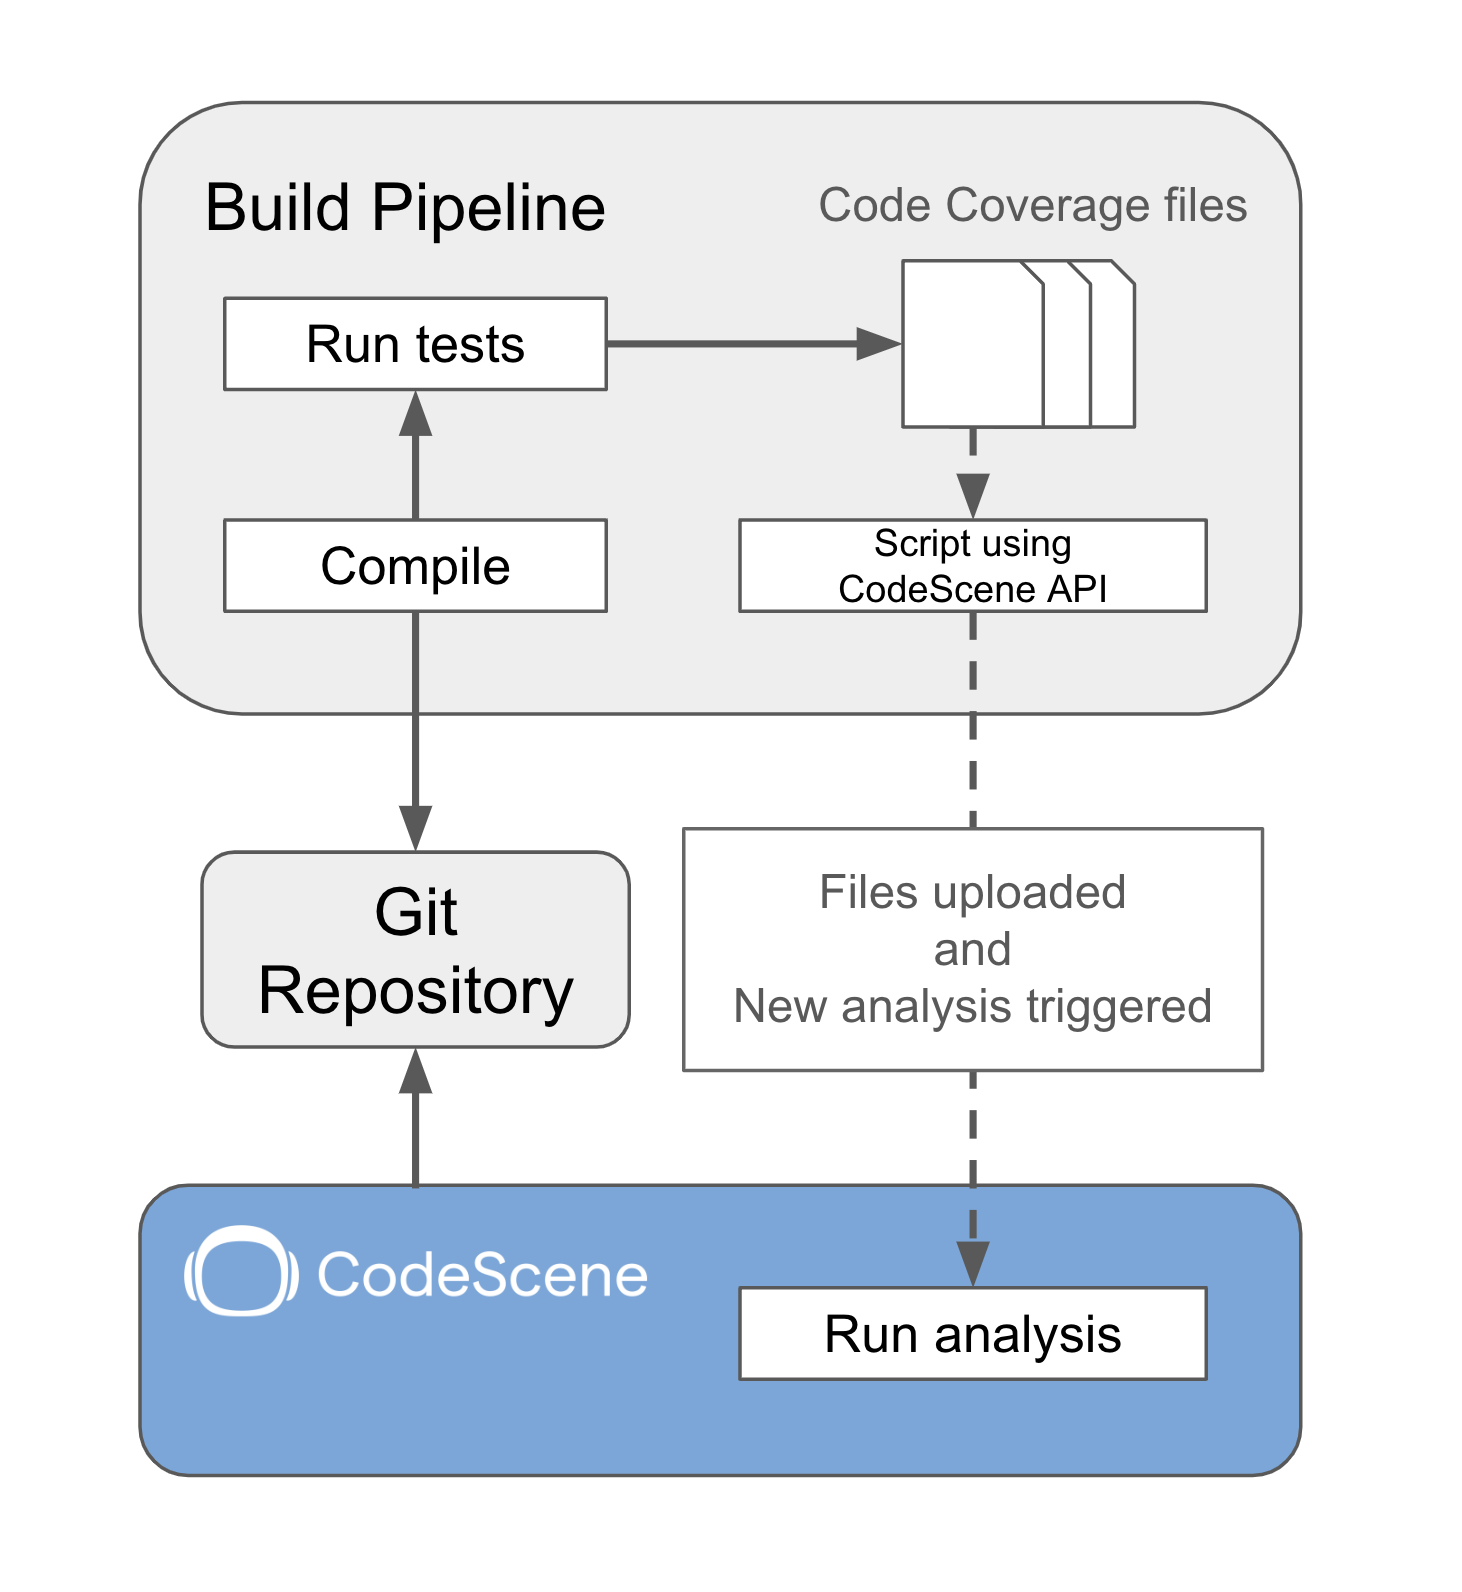
Fig. 72 The coverage results are generated as part of a build pipeline and uploaded to CodeScene.
The coverage data in CodeScene is not tied to a specific project. Instead, uploading coverage data for a repository means it will automatically be available for all projects analyzing that repository. But to be used, the data needs to be relevant to the commit being analyzed in CodeScene. The following restrictions apply to how coverage data is used during analysis:
Coverage data will only be used during analysis if the coverage data was produced for the same or an ancestor commit.
If the coverage data is for an ancestor commit, data won’t be shown for files that have changed since that commit.
CodeScene will not merge coverage data for a single file from different uploads. If several uploads contains data for the same file, the most recent (applicable) one will be used.
The coverage data formats supported by CodeScene contain information about coverage for files, but lack some metadata that is necessary to reliably map the coverage data to analyzed files. For that reason, the API for uploading data requires that metadata, like commit sha and repo url, is specified when requesting an upload.
API Details
Given that you have code coverage data produced and present on disk, uploading the coverage data to the CodeScene API requires a few discrete steps:
compress the data into
gzipformatrequest the upload and specify metadata using the
code-coverage/uploadPOST endpointupload the compressed data using the
code-coverage/upload/[ID]PUT endpoint.
To make this process simpler, CodeScene provides upload scripts that encapsulates these steps into a single script call.
Example for GitHub Actions
Uploading Code Coverage data to CodeScene from a build pipeline means inserting an upload step after test steps that produce coverage data have run. For GitHub actions this can be accomplished by adding a step similar to this:
- name: Upload coverage data to CodeScene
run: |
  curl -Os https://downloads.codescene.io/code-coverage/linux/upload.sh
  chmod +x upload.sh
  ./upload.sh \
    --repopath "$(pwd)" \
    --format open-clover \
    --metric statement-coverage \
    --file coverage/clover.xml
env:
  CS_TOKEN: ${{ secrets.CS_TOKEN }}
shell: bash
This downloads the upload script and runs it with proper arguments.
For OnPrem users, CS_HOST, CS_USER and CS_PASSWORD will have to be
set similar to CS-TOKEN in this example.
Example script for Windows
Windows (power shell)
Usage: upload.ps1 -repopath "value" -file "absolute-path-to-the-code-coverage-file" [-subpath "value"] [-format "value"] [-metric "value"]
This script can be used with CodeScene Cloud (codescene.io) or CodeScene On-Prem (see codescene.com)
You need to set the following environment variables:
 - CS_USERNAME - the CodeScene API username (only CodeScene On-Prem)
 - CS_PASSWORD - the CodeScene API password (only CodeScene On-Prem)
 or
 - CS_TOKEN    - the CodeScene API token (CodeScene Cloud or CodeScene On-Prem)
 Parameters:
 -cshost   - if not specified will try to get the value from environment variable CS_HOST, if not found will upload to CodeScene Cloud
 -repopath - absolute path to the cloned git repository, ex: /home/myuser/repos/codescene
 -subpath  - in case you have a monorepo with more then one project you can set the subpath, ex: /frontend
 -format   - the code-coverage file format, if not specified the default is: lcov
 -metric   - the code-coverage metric, if not specified the default is: line-coverage
 -file     - the absolute path to the file containg code-coverage information
#Example
#---------------------
#upload code coverage data on-prem

$Env:CS_HOST="http://localhost:3003"
$Env:CS_USERNAME="test"
$Env:CS_PASSWORD="test"
upload.ps1 -repopath "c:\tmp\myproject" -subpath "\frontend" -file c:\tmp\coverage/lcov.info

#trigger new analysis on-prem for project with id 123
$Env:PROJECT_ID=123
$CREDENTIALS = [System.Convert]::ToBase64String([System.Text.Encoding]::ASCII.GetBytes("$Env:CS_USERNAME`:$Env:CS_PASSWORD"))
$HEADER = @{
    "Authorization"="Basic $CREDENTIALS"
    "Content-Type"="application/json"
}
curl -Method POST -Headers $HEADER $Env:CS_HOST/api/v2/projects/$Env:PROJECT_ID/run-analysis -Body ""

#---------------------
#upload code coverage data cloud

$Env:CS_TOKEN="<your_token_here>"
upload.ps1 -repopath "c:\tmp\myproject" -subpath "\frontend" -file c:\tmp\coverage/lcov.info

#trigger new analysis on-prem for project with id 123
$Env:PROJECT_ID=123
$HEADER = @{
    "Authorization"=""Bearer $Env:CS_TOKEN""
    "Content-Type"="application/json"
}
curl -Method POST -Headers $HEADER http://api.codecene.io/v2/projects/$Env:PROJECT_ID/run-analysis -Body ""
Example script for Mac and Linux
Linux or Mac
Usage: upload.sh --repopath "value" --file "absolute-path-to-the-code-coverage-file" [--subpath "value"] [--format "value"] [--metric "value"]
This script can be used with CodeScene Cloud (codescene.io) or CodeScene On-Prem (see codescene.com)
You need to set the following environment variables:
 - CS_USERNAME - the CodeScene API username (only CodeScene On-Prem)
 - CS_PASSWORD - the CodeScene API password (only CodeScene On-Prem)
 or
 - CS_TOKEN    - the CodeScene API token (CodeScene Cloud or CodeScene On-Prem)
 Parameters:
 --cshost   - if not specified will try to get the value from environment variable CS_HOST, if not found will upload to CodeScene Cloud
 --repopath - absolute path to the cloned git repository, ex: /home/myuser/repos/codescene
 --subpath  - in case you have a monorepo with more then one project you can set the subpath, ex: /frontend
 --format   - the code-coverage file format, if not specified the default is: lcov
 --metric   - the code-coverage metric, if not specified the default is: line-coverage
 --file     - the absolute path to the file containg code-coverage information
#Example on-prem and cloud version
#---------------------
#upload code coverage data on-prem
CS_HOST=http://localhost:3003 CS_USERNAME=test CS_PASSWORD=test bash upload.sh --repopath "/tmp/myproject" --subpath "/frontend" --file /tmp/coverage/lcov.info

#trigger new analysis on-prem for project with id 123
PROJECT_ID=123
curl -X 'POST' \
  -u "${CS_USERNAME}:${CS_PASSWORD}" \
  '${CS_HOST}/api/v2/projects/{PROJECT_ID}/run-analysis' \
  -H 'accept: application/json' \
  -d ''

#---------------------
#upload code coverage data cloud
CS_TOKEN=<your_token_here> bash upload.sh --repopath "/tmp/myproject" --subpath "/frontend" --file /tmp/coverage/lcov.info

#trigger new analysis cloud for project with id 123
PROJECT_ID=123
curl -X 'POST' \
  'http://api.codecene.io/projects/{PROJECT_ID}/run-analysis' \
  -H 'accept: application/json' \
  -H 'authorization: Bearer ${CS_TOKEN}' \
  -d ''
Creating code coverage data
As stated above CodeScene doesn’t generate the code coverage data. There are several alternatives of tools to generate these files depending on your code language. Please refer to each tool’s specific instructions for setting this up for your repositories.