Users and Roles
CodeScene lets you create users and grant them various levels of access depending on their roles.
First Time Access
Use your CodeScene Username and License Key the first time you login to CodeScene. That way you will be granted full administrative privileges. We recommend using the administrator login only for the initial setup of a dedicated Admin user role, as well as user accounts with restricted access for regular work.
Adding Users
Adding users requires Admin privileges.
By clicking on Configuration and the Users/Authentication tab in the top navigation bar, you can access the Users configuration page. As an administrator, you should see the Users configuration, as in Fig. 232.
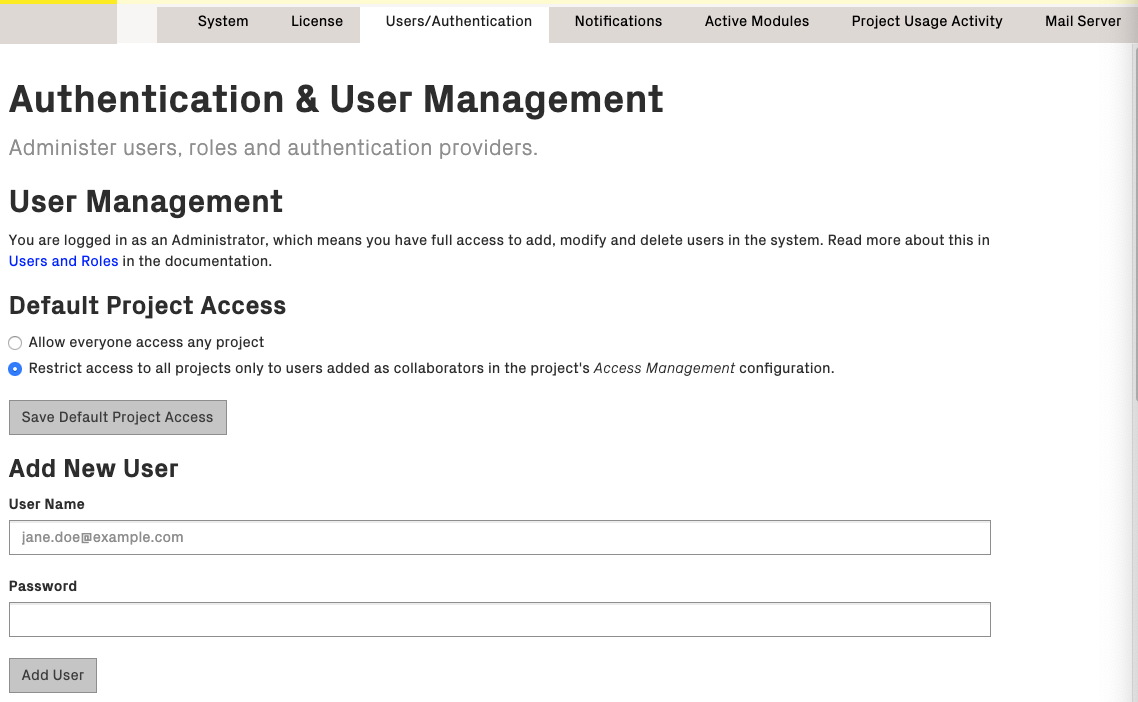
Fig. 232 In the global configuration you can add new users to the system.
Enter the user name and password, and click “Add User” to finish. The password can be changed later if needed, either by the administrator or by the users themselves.
Assigning Roles
The system comes preconfigured with a number of roles. You can assign roles to the users in your system to grant them specific access.
- Admin
Full configuration access, including user management, global configuration, and deletion of projects.
- Technical
Technical and architectural analyses only. No social analyses.
- Developer
Technical, architectural and social analyses ; run delta analysis
- Test Leader
Technical, architectural and social analyses; plan goals; run delta analysis
- Technical Lead
Technical, architectural and social analyses; plan goals; run analysis
- Architect
Technical, architectural and social analyses; plan goals; run analysis; project configuration; create new projects; delete projects
- Manager
Full access and configuration privileges; create new projects; delete projects
- Full Read-only Access
All analysis results, but cannot perform any actions such as running analyses, changing configs, or planning goals.
- Bot
This role is intended for third-party integrations like code review or continuous integration bots. This role is allowed to trigger a delta analysis and access the overview of the result.
In the table of existing users you can see the currently assigned roles. Click on the Role select box, as shown in Fig. 233, to change the assigned role of a user.
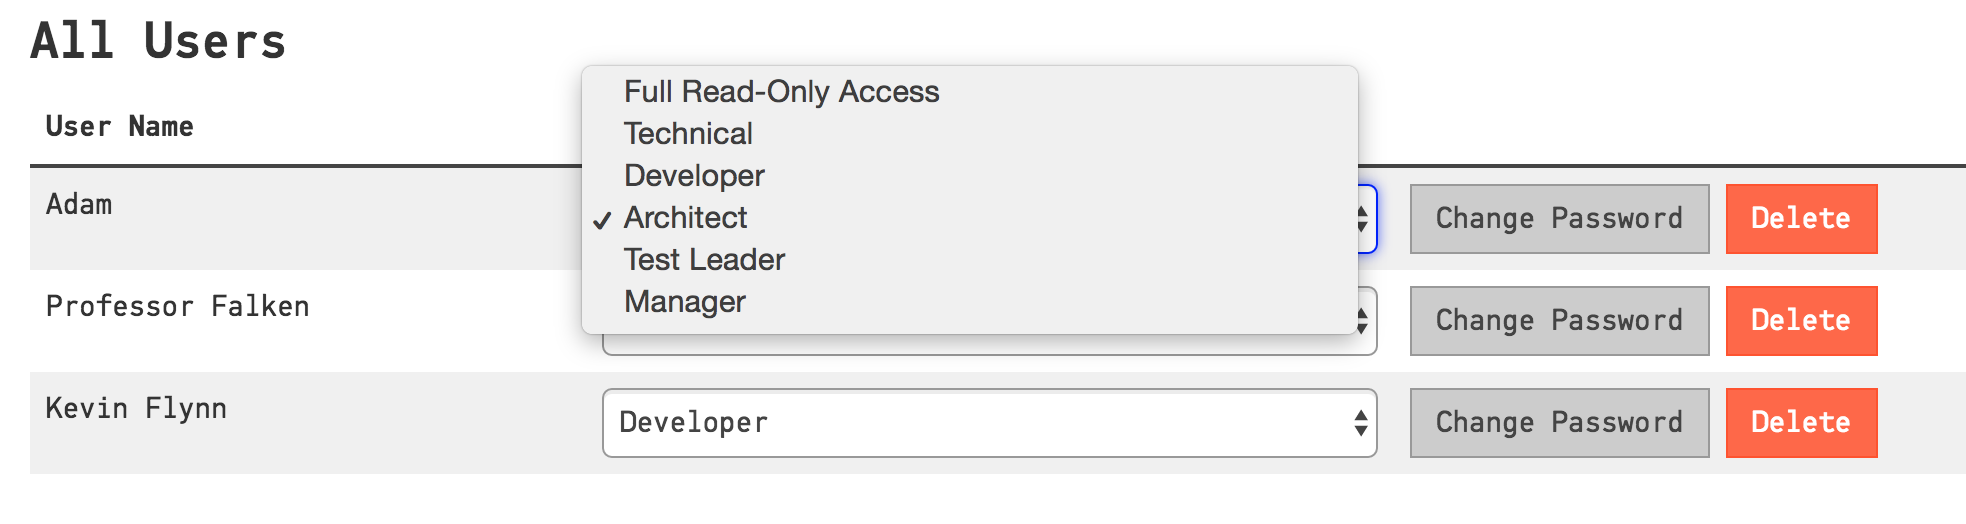
Fig. 233 By clicking the Role select box you can change the assigned role of a user.
Permissions by Role
This is a more detailed description of various permissions associated with the CodeScene roles.
Role |
Permissions |
|---|---|
Technical |
|
Developer |
Same as Technical plus:
|
Architect |
Same as Developer plus:
|
Test Leader |
|
Manager |
|
Full Read-only Access |
|
Bot |
|
Project Access Management
Global Configuration
By default, all projects are visible to all CodeScene users. You can change this setting by selecting “Restrict access to all projects …” in the global configuration as shown in Fig. 234.

Fig. 234 Changing the default project access to restricted
When access is restricted, only ‘project collaborators’ are allowed to access a project. Read more about project collaborators in the next section.
Project-specific Configuration
The administrator or users with the Architect role can configure project access management settings
on a per-project basis in the project configuration tab Access Management:
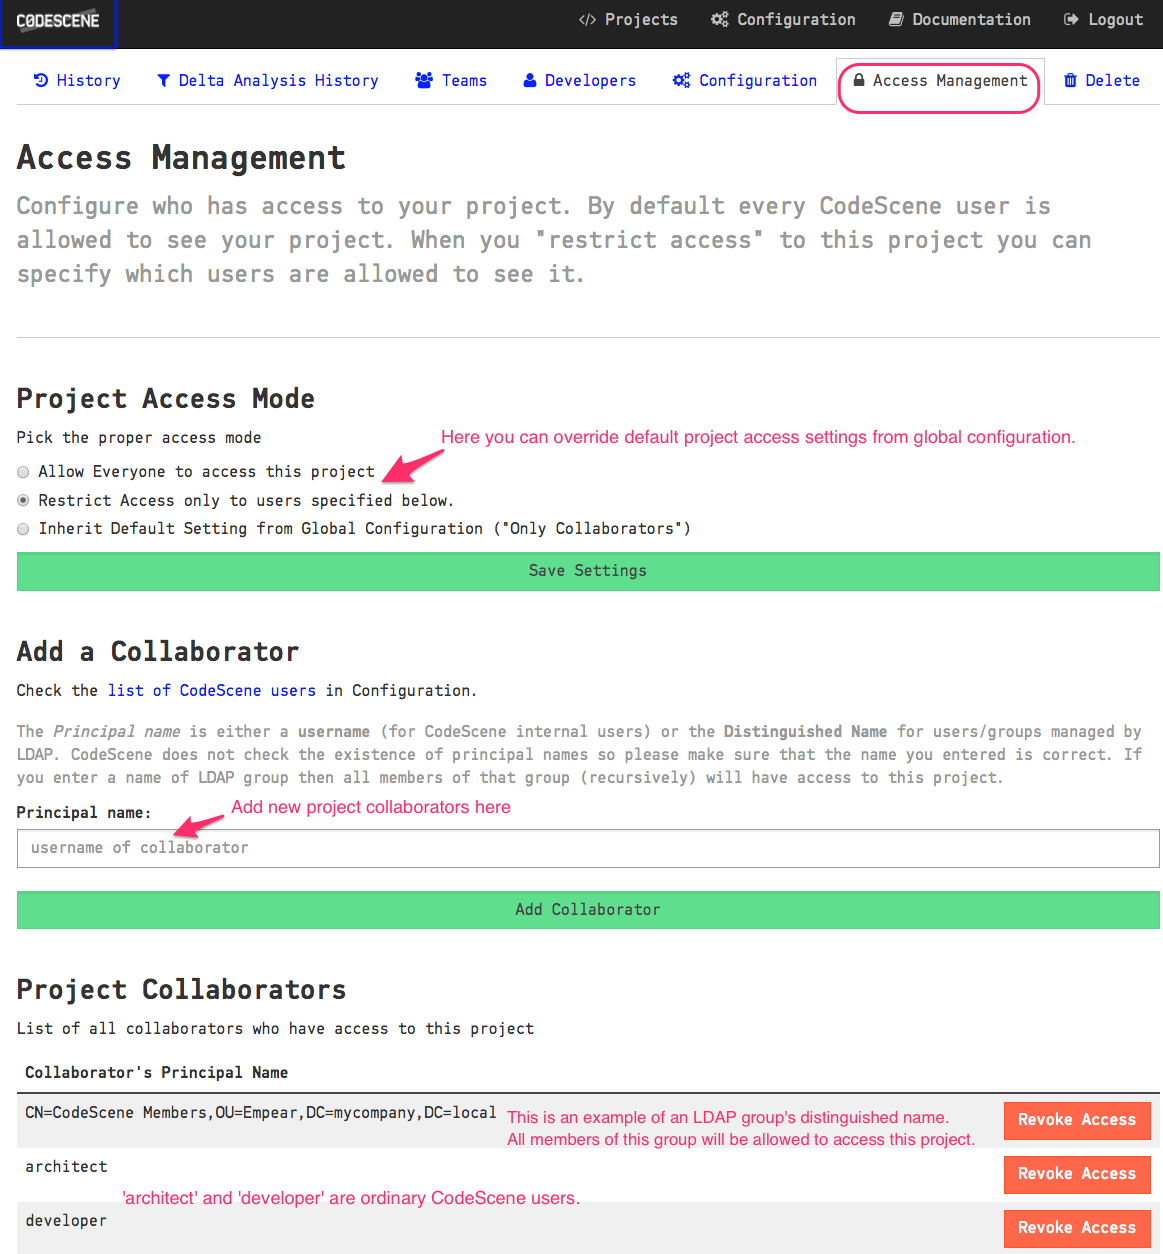
Fig. 235 Project access management configuration
Project Access Mode
There are three choices for Project Access Mode:
Allow Everyone - everyone is allowed to access the project regardless of the
Default Project Accesssetting in the global configurationRestrict Access - only project collaborators are allowed to access the project
Inherit Default Setting - use whatever project access mode is set in the global configuration.
Note: The administrator can always access all projects.
:: _project-collaborators:
Project Collaborators
`````````````````
To add a normal CodeScene user as a collaborator just enter their username and click the Add Collaborator button.
For an LDAP user, use the distinguished name of the LDAP user or some of their LDAP groups.
You can also enter multiple collaborators separated by semicolons.
When a collaborator logs in, they will only be able to see projects accessible to them.
If you use the delta analysis API you need to add your Bot user to project collaborators too.
Single Sign-On
By default, CodeScene operates with an internal user database. Alternatively, you can configure another authentication provider, such as LDAP/Active Directory or OAuth2/OpenID Connect, to perform identity verification for your users, thus avoiding the duplication of your users’ accounts in CodeScene. Users can then log in using the same credentials that they use for other services within your system. When using OAuth2/OpenID Connect, the users are redirected to the configured provider to authorize CodeScene at first login.
LDAP Authentication Provider
A generic LDAP server or Active Directory can be used for user authentication.
LDAP authentication is turned off by default and the configuration fields are hidden as shown in Fig. 236.
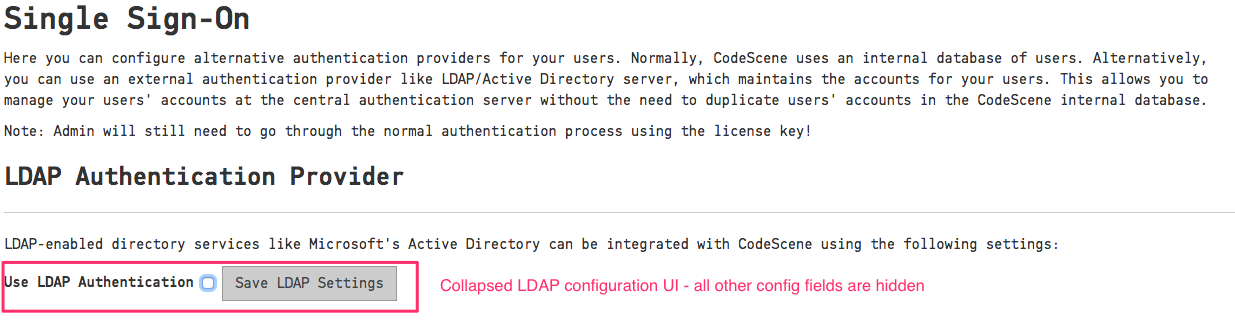
Fig. 236 Inactive LDAP authentication
Activate LDAP Authentication by clicking on the “Use LDAP Authentication” checkbox and fill in the details as shown in Fig. 237.
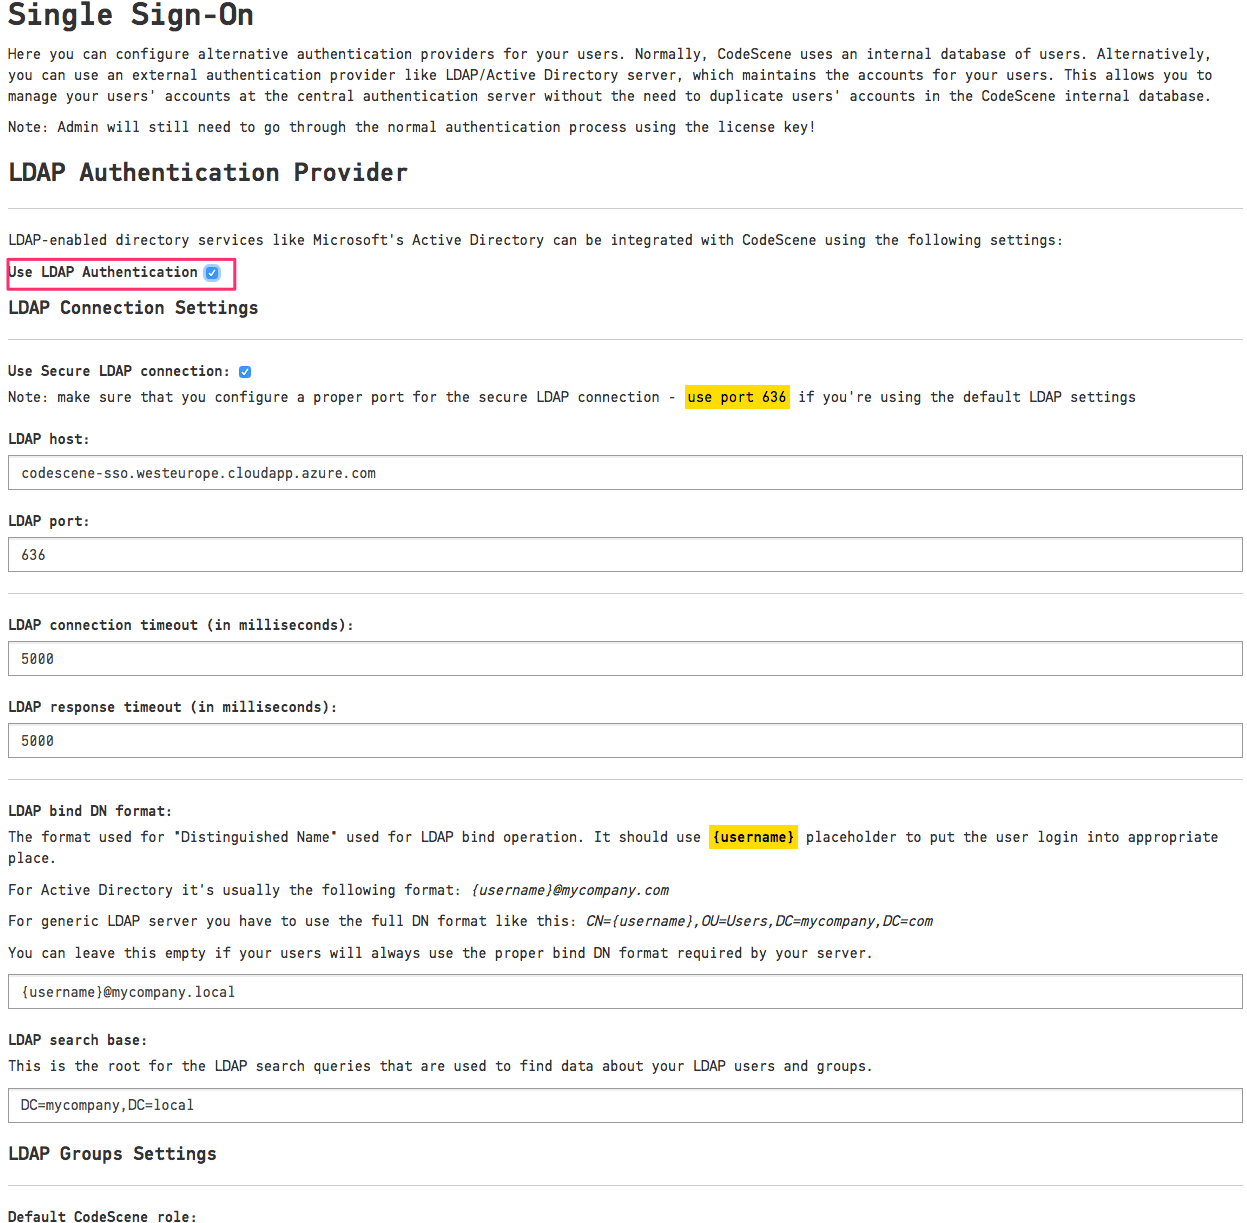
Fig. 237 Active LDAP authentication
You will need to configure the “LDAP host” address and the “LDAP search base” settings. CodeScene provides default values for the remaining settings, e.g. port and connection timeouts.
The “LDAP search base” is used as a root for LDAP queries searching for data about users and their groups. Make sure to specify a proper base for the search to not miss any relevant user data. See Components of an LDAP Search: for more details.
The “LDAP Bind DN format” is used to create a proper full login name accepted by your LDAP server. It’s usually a full “Distinguished Name”, although Active Directory supports various formats like the “User Principal Name” (e.g. username@mycompany.com) or sAMAccountName. You will use {username} placeholder to configure the username expansion - see the examples on the Configuration page. You can leave this field empty if your users always enter the full login name manually.
We also encourage you to use the “Secure LDAP” connection by checking the “Use Secure LDAP connection” checkbox. In this case, you will need to change the LDAP port too; secure LDAP connections often use port 636.
LDAP Roles Settings
Like normal CodeScene users, users authenticated with the LDAP authentication provider also need to have a “role” assigned to them. This is done with the “LDAP Roles Settings” as shown in Fig. 238.
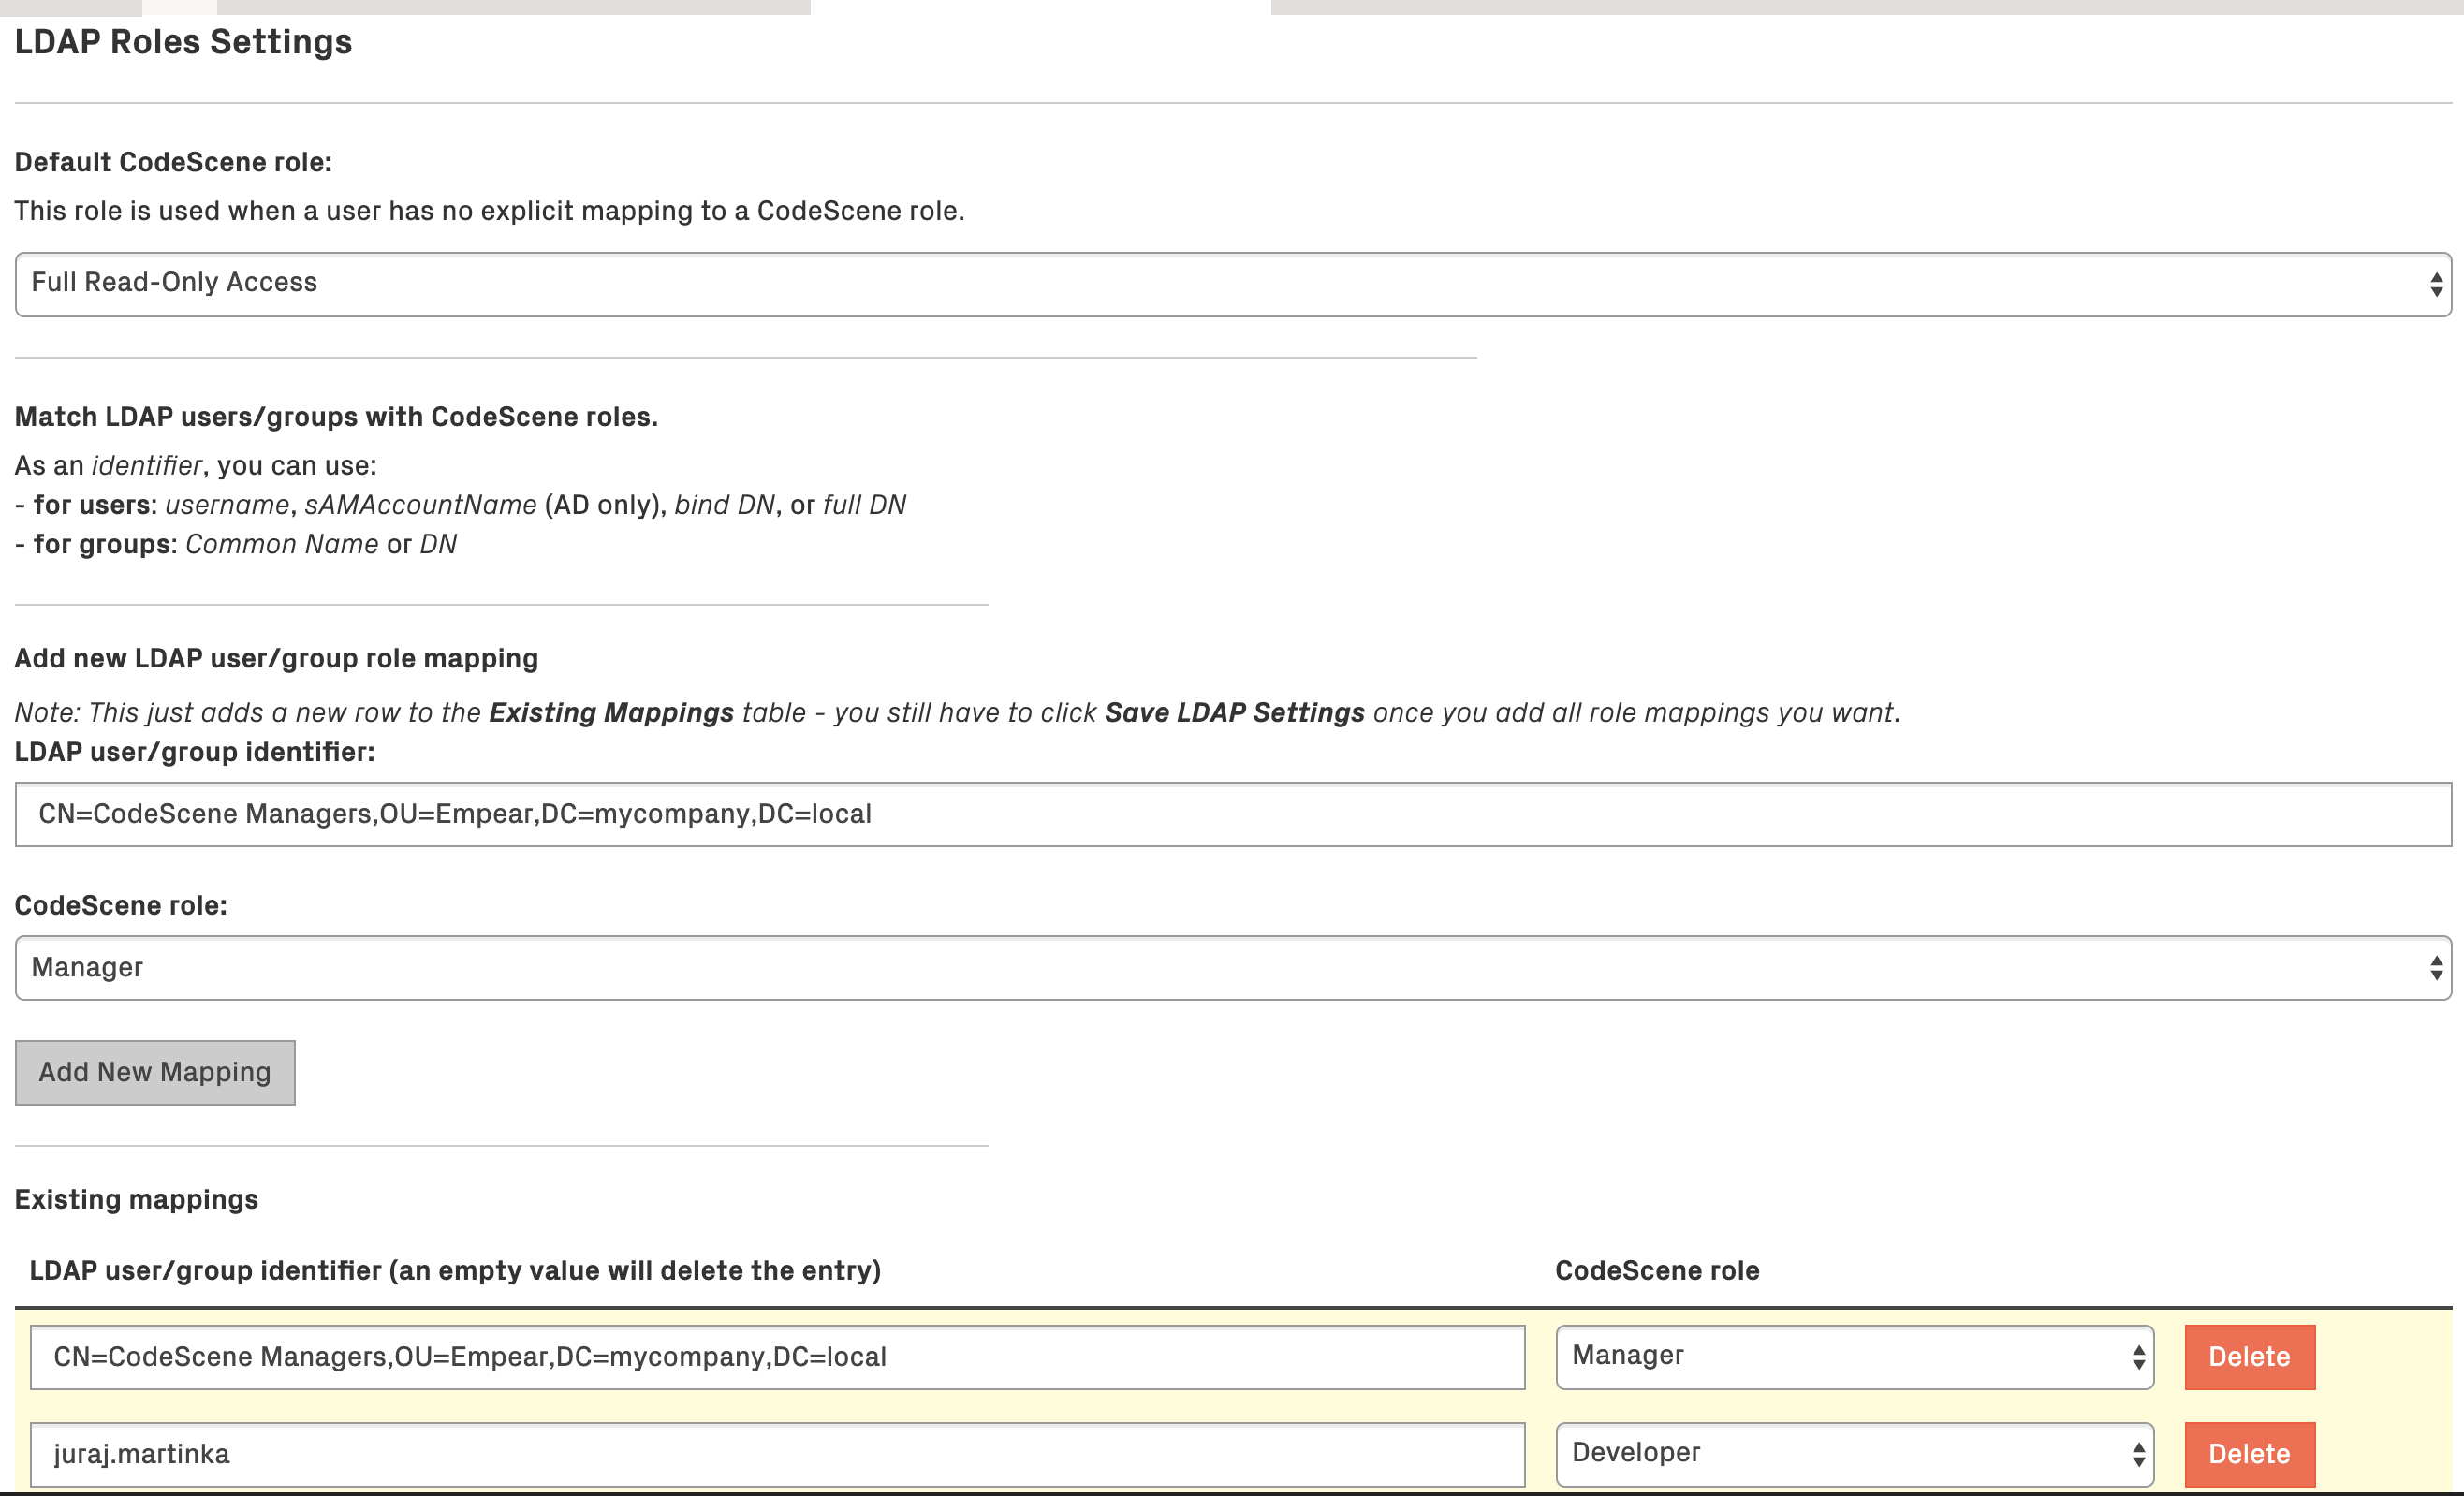
Fig. 238 LDAP Roles Settings
When user data is fetched from an LDAP server, the user’s “identifiers” and his LDAP groups are matched to CodeScene roles based on the “LDAP Roles Settings” configuration:
To identify a user, you can use his username, sAMAccountName (Active Directory only), bind DN, or full DN.
To identify a group, you can use full DN or Common Name - note that using Common Name isn’t recommended and is provided only for backward compatibility reasons (the Common Name attribute isn’t guaranteed to be unique and it isn’t possible to use it in Project Access Management).
In the example configuration, you can see that the user juraj.martinka has the role Developer and all members of the LDAP group CN=CodeScene Managers,OU=Empear,DC=mycompany,DC=local are Manager-s.
Nested groups are supported; that is if the LDAP user is a member of the group “Managers” which is a member of the group “CodeScene Managers” then that LDAP user will have the CodeScene’s Manager role too.
If no matching CodeScene role is found for the LDAP user, the value of “Default CodeScene role” is used. By default, this is set to Full Read-Only Access, but it can be changed to a more restrictive role or even a special No Access role which will deny access to all LDAP users who aren’t mapped explicitly. You can see this in Fig. 239.
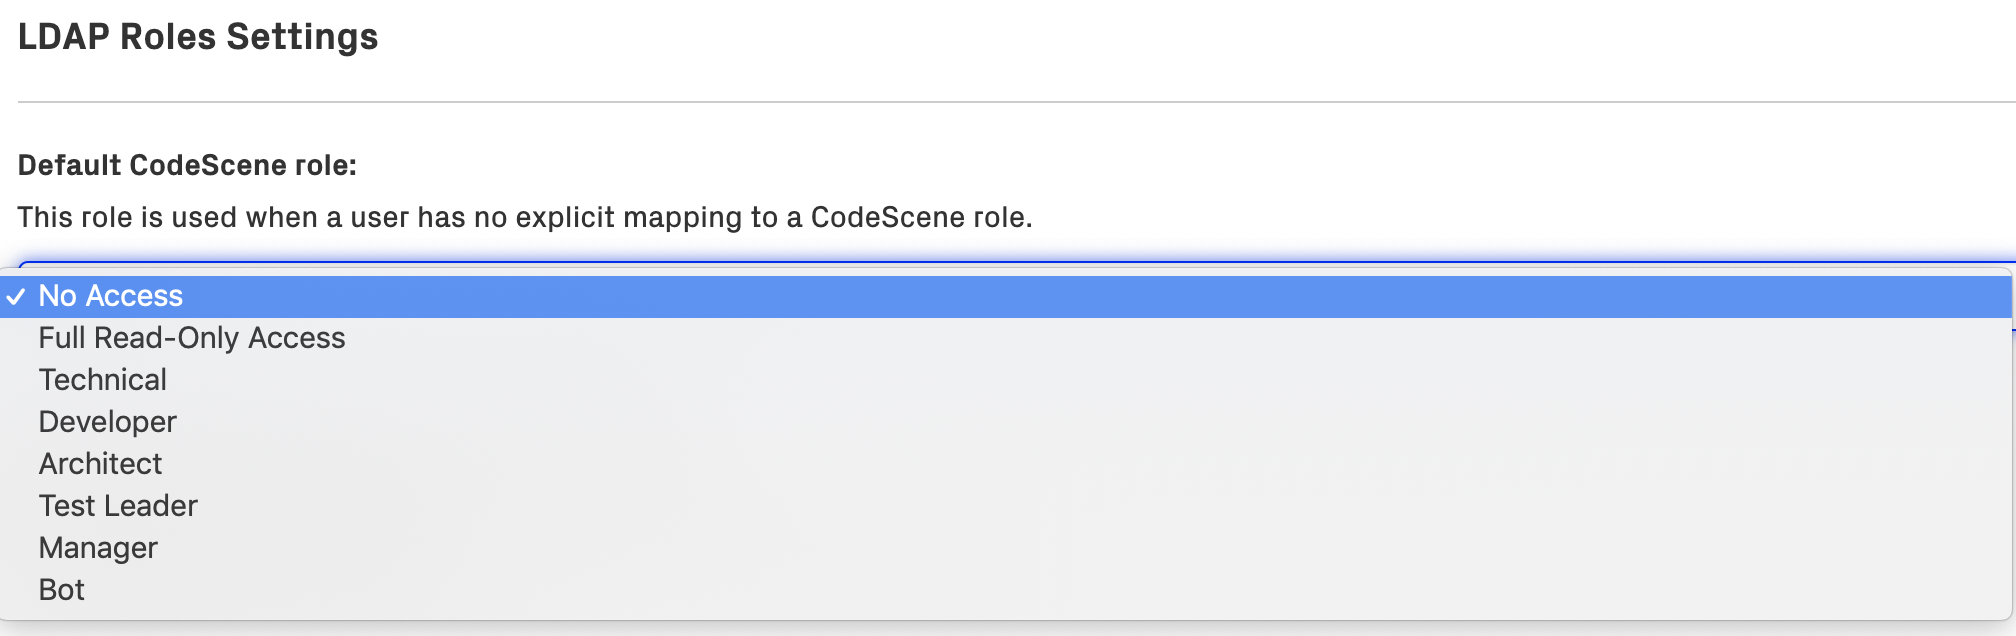
Fig. 239 LDAP Roles Settings - default role: “No Access”
OAuth2 Authentication Provider
A generic OAuth2/Open ID Connect server can be used for user authentication. CodeScene supports the Authorization Code Grant flow, and uses the token received through the authorization process to access user and team info from configurable URLs at the OAuth2 provider.
OAuth2 authentication is turned off by default and the configuration fields are hidden as shown in Fig. 240.

Fig. 240 Inactive OAuth2 authentication
Activate OAuth2 Authentication by clicking on the “Use OAuth2 Authentication” checkbox and fill in the details as shown in Fig. 241.
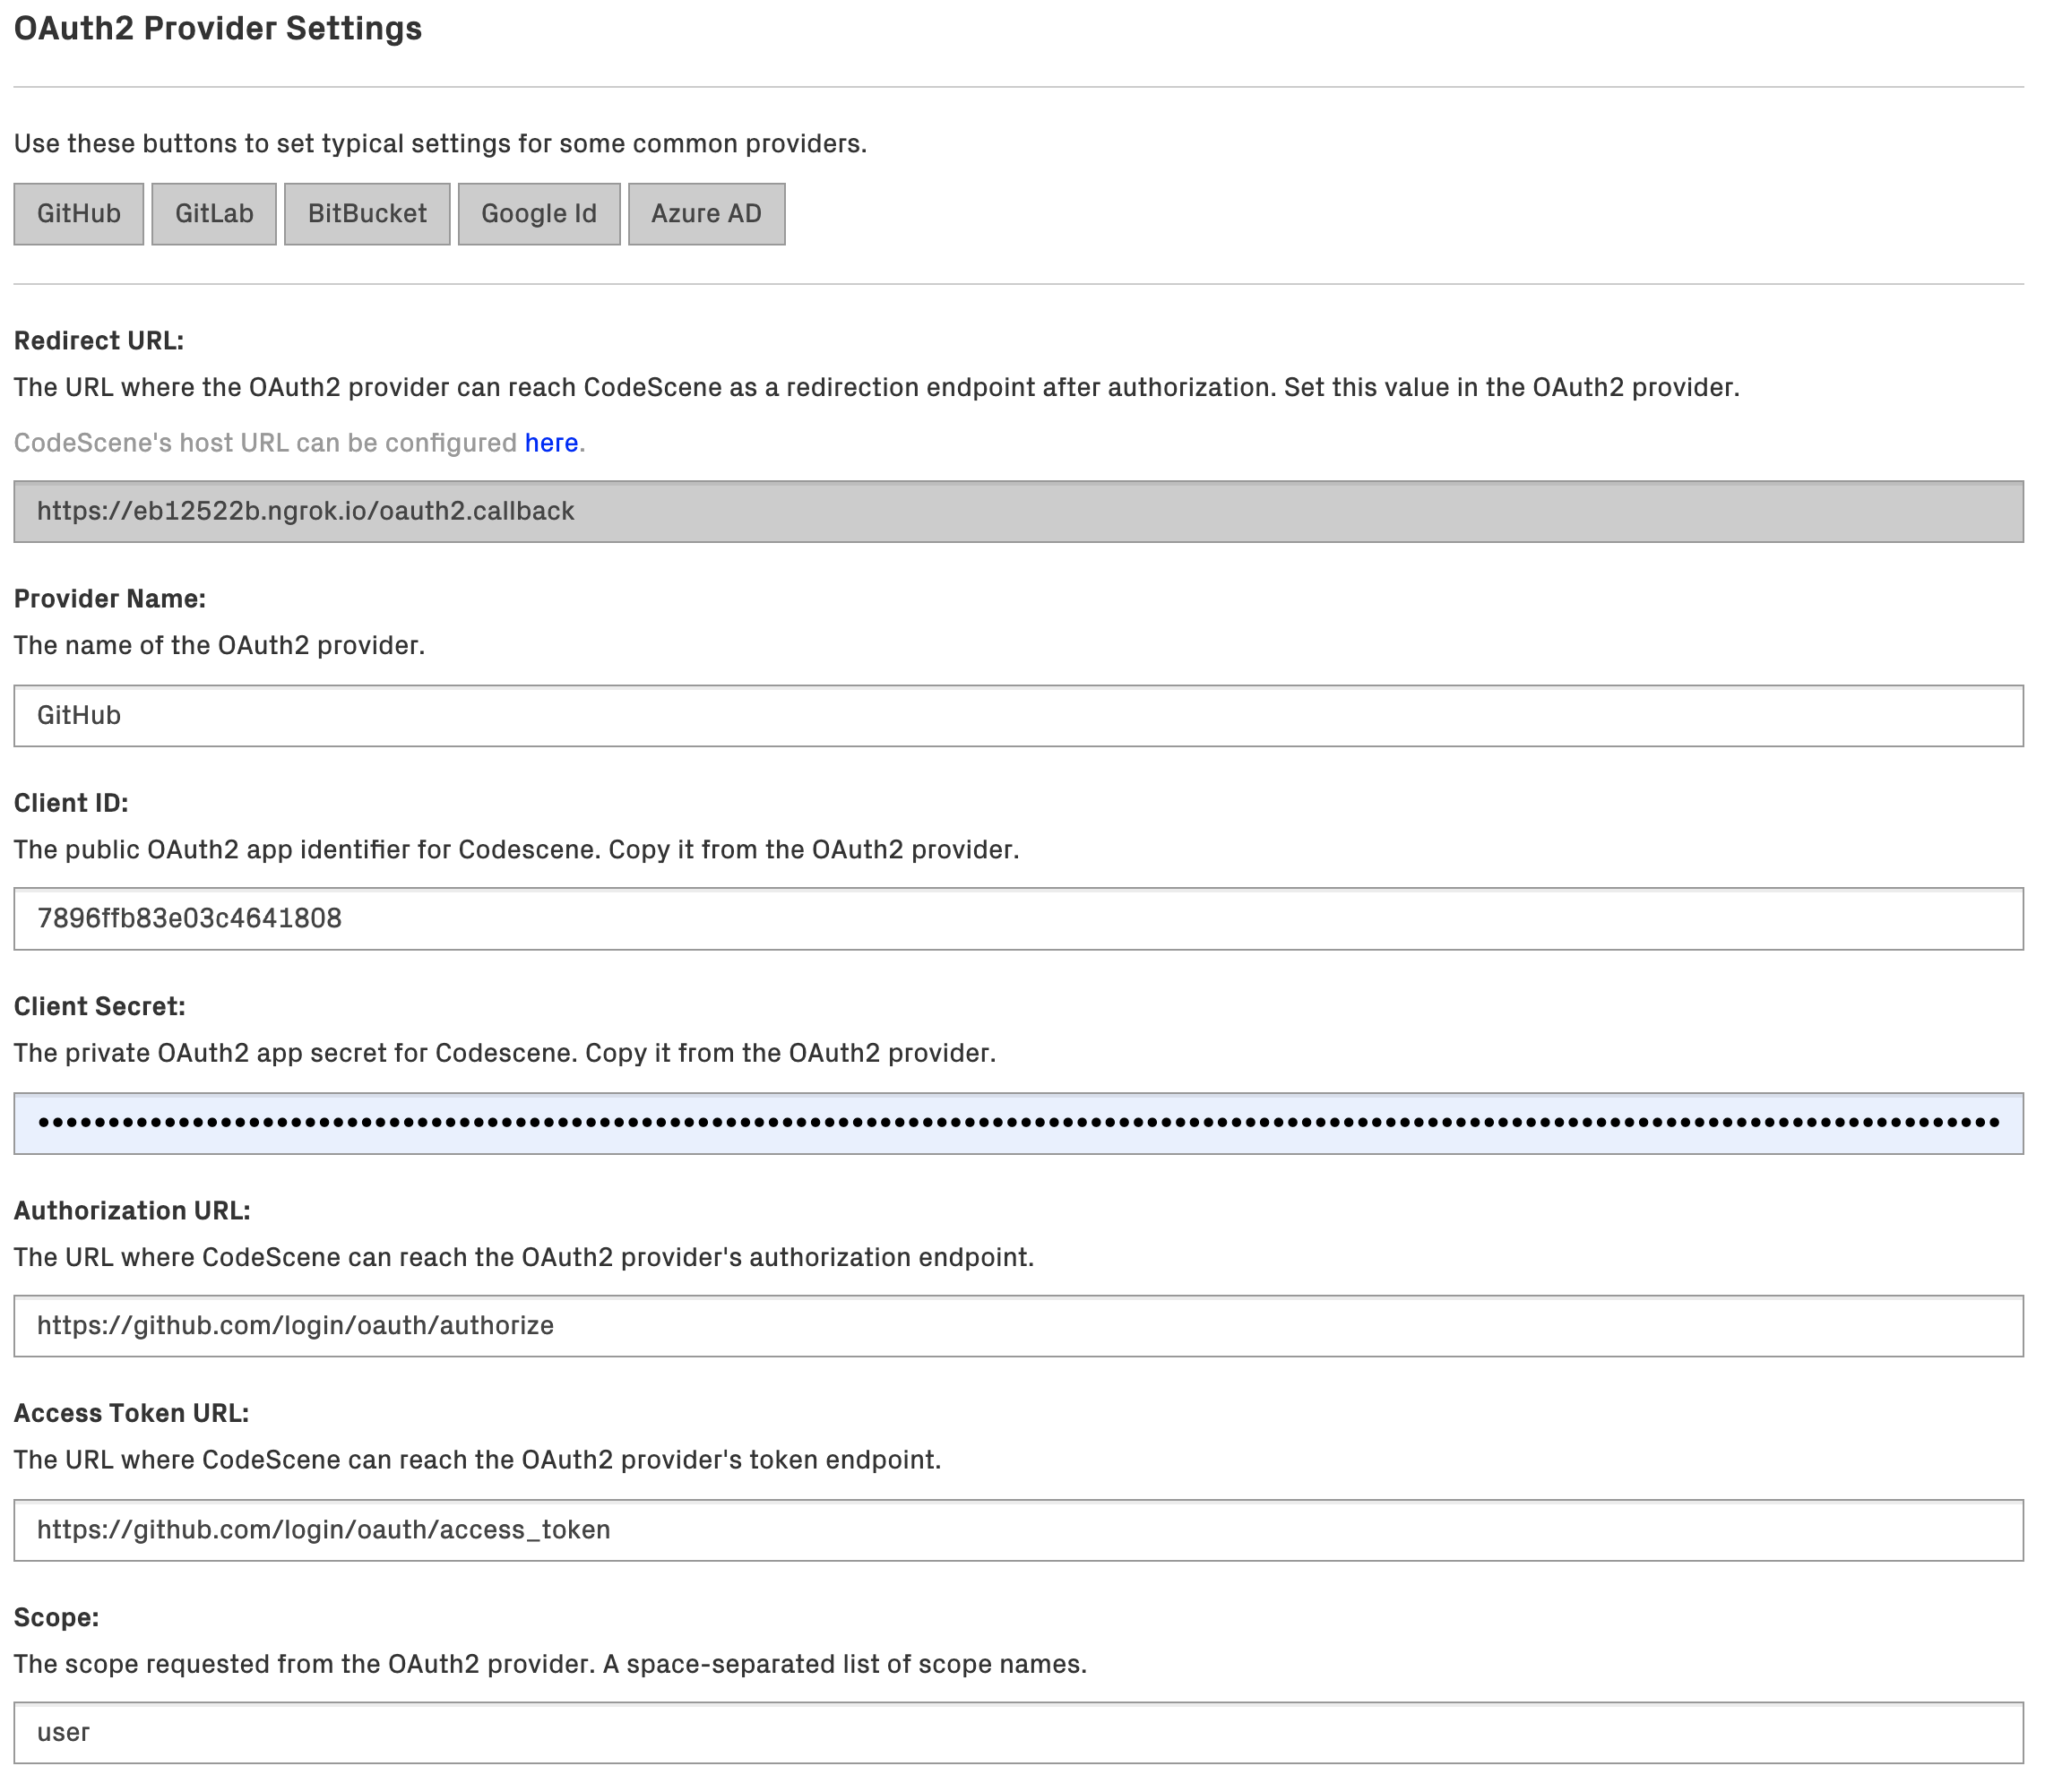
Fig. 241 OAuth2 Provider Settings
You will need to register CodeScene as an application/consumer at the OAuth2 provider. The provider will then create a Client ID and Secret that you use when configuring the provider in CodeScene. The other settings are specific for each provider, and the buttons at the top can be used to set these to typical settings for some common providers. Note that the scope requested must be such that it gives access to the specified user/team URLs and fields.
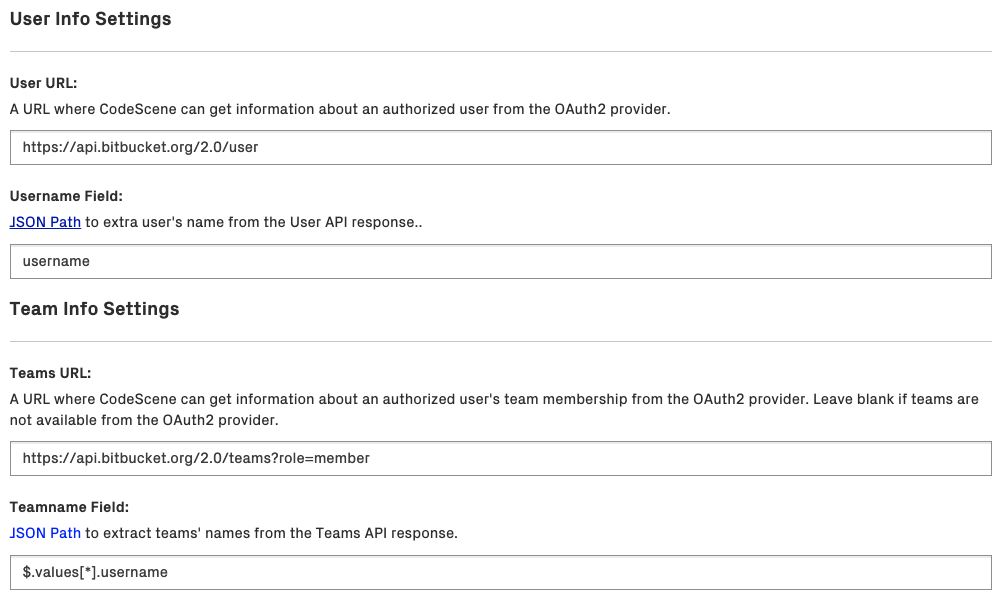
Fig. 242 OAuth2 User and Team Settings
The User URL setting supports URLs like the OpenID Connect UserInfo endpoint, i.e. an URL that, when given an access token, returns claims for the logged in user.
Similarly, the Teams URL supports URLs that, when given an access token, return a list of the teams that the logged in user is a member of.
Note about the User Name and Team Name fields:
The User Name field is a JSON Path that selects an attribute in the user API response that represents a user’s identifier.
The Team Name field is a JSON Path that selects names of all teams in the teams API response. Check the typical settings for providers. Some providers return teams as a top-level JSON array while others (like BitBucket and Azure AD) return them wrapped in another top-level JSON object. Yet another providers (e.g. PingID’s groups attribute) don’t provide a proper list but instead return a simple string where groups are separated by a comma (CodeScene has special support to handle this scenario - so for PingID you would just use $.groups).
E.g. Bitbucket Teams API may return following API response:
{
  "pagelen" : 10,
  "values" : [ {
    "username" : "empear",
    "display_name" : "empear",
    "uuid" : "{f19d05a0-693c-4327-bd80-58eff5a64d04}",
    "links" : {
      "hooks" : {
        "href" : "https://api.bitbucket.org/2.0/teams/%7Bf19d05a0-693c-4327-bd80-58eff5a64d04%7D/hooks"
      }
    },
    "created_on" : "2018-04-16T13:38:09.387625+00:00",
    "type" : "team",
    "properties" : { },
    "has_2fa_enabled" : null
  } ],
  "page" : 1,
  "size" : 1
}
To extract the team name, which is stored as the username field in the values array, we use the following JSON Path syntax: $.values[*].username. The * symbol selects all the elements (teams) in the values array if multiple teams are returned in the response.
In summary, the steps to follow for configuring OAuth2 authentication are:
In CodeScene, make sure the CodeScene Host URL is set to a URL where CodeScene can be reached from the OAuth2 Provider.
Note the Redirect URL in CodeScene’s OAuth2 Provider Settings.
At the OAuth2 provider, register an application/consumer and set the Callback/Redirect URL to CodeScene’s Redirect URL.
Note the Client ID and Client Secret values.
In CodeScene, set the Client ID and Client Secret values.
Set the other OAuth2 Provider Settings to values specific for the OAuth2 provider.
OAuth2 Roles Settings
OAuth2 role settings and matching works exactly as described in LDAP Roles Settings with the difference that the matching in this case is done using the username and team names acquired from the User/Team URLs as defined in the Oauth2 Provider Settings.