Installation
There are two recommended options for installing CodeScene:
Standalone Jar: see the section Run the Standalone CodeScene Application below.
CodeScene inside a Docker container: We provide an empear/codescene docker image and instructions for using it on Docker Hub.
We also support running CodeScene in Tomcat but it’s better to choose the other installation options if possible.
Database for persisting System and Analysis Configurations
CodeScene comes with a built-in embedded database (H2) that persists all the data in a single file. Usually, database access is not a performance bottleneck (it might become an issue if you use a shared file system).
This default option is the recommended choice.
It’s important to backup the database regularly. See DB Backup for description of various backup options
Set up an External Database
CodeScene also supports external database engines mysql (minimum version: 5.7.30) and mariadb (minimum version: 10.1.44). This is an option for organizations that want a more fine-grained control over operations and backups.
Note: you can also migrate your existing CodeScene data from H2 to MySQL.
Add if not exist to your mysql or mariadb server configuration the following
[mysqld]
lower_case_table_names = 1
First, you need to create a new database user and the database:
create user: https://dev.mysql.com/doc/refman/5.7/en/create-user.html
CREATE USER 'sa'@'localhost' IDENTIFIED BY '';
create database: https://dev.mysql.com/doc/refman/5.7/en/charset-database.html
CREATE DATABASE codescene CHARACTER SET utf8mb4 COLLATE utf8mb4_unicode_ci;
grant privileges:
GRANT ALL PRIVILEGES ON codescene.* TO 'sa'@'localhost';
If needed, you can then update your CodeScene DB configuration as shown in the DB Configuration section.
Secure DB connections
For secure connections, your database server must support TLS 1.1 or earlier. Servers that allow only TLS v1.2 (or later) aren’t supported. If you try to start CodeScene configured to connect to the MySQL server that supports only TLS 1.2 you will see the following error (this is when using hosted MySQL from Azure):
Caused by java.sql.SQLException TLS version used does not meet minimal requirements for this server. Please use a higher TLS version and retry.
Configuring your MySQL server to support secure DB connections is vendor-dependent. For Azure MySQL server, you can find relevant info here:
https://docs.microsoft.com/en-us/azure/mysql/concepts-ssl-connection-security
https://docs.microsoft.com/en-us/azure/mysql/howto-configure-ssl
Check also CODESCENE_DB_SSL_MODE in the next section.
DB Configuration
CodeScene is using the following environment variables when connecting to the database - you can tweak them to connect to an external database (instead of the default H2 db). For Tomcat deployment, you can also use JNDI Context properties as documented in the Tomcat installation section Optional: Other Database Engine.
- CODESCENE_DB_ENGINE
“h2” (default), “mysql” or “mariadb”
- CODESCENE_DB_HOST
default: “localhost”
- CODESCENE_DB_PORT
used only for MySQL and MariaDB, default: 3306
- CODESCENE_DB_NAME
default: “codescene”
- CODESCENE_DB_USER
default: “sa”
- CODESCENE_DB_PASSWORD
default: “”
- CODESCENE_DB_SSL_MODE
no default
- CODESCENE_DB_ENABLED_TLS_PROTOCOLS
default: “TLSv1,TLSv1.1,TLSv1.2”
DB Backup
It’s important to backup the database regularly. All CodeScene’s configuration (projects, global configuration, etc.) is stored in the database and you will have to re-create it from scratch if the database is corrupted.
The exact mechanism for performing backups depends on the deployment option you’ve chosen:
for the built-in embedded database (H2) shutdown the CodeScene process and copy the DB file to your backup location. To get more information regarding the location of the database file see: Define the Root Paths for Persistent Data.
for MySQL follow the instructions from MySQL Backup.
for MariaDB follow the instructions from MariaDB Backup.
A simple Cron job might work just fine. For the “public cloud” option, it’s usually better to use a managed solution, e.g. Azure Backup.
(External) DB Performance
The default H2 database is stored in a file on a local disk that is supposed to be fast.
Normally, CodeScene does not impose a heavy load on the database. Using a slower database will generally not affect the duration of analyses. The user interface, and in particular the main projects dashboard page, may appear slower in some cases.
If you use an external database like MySQL make sure that network latency isn’t high (tens of milliseconds). It’s recommended to host your database in the same datacenter as CodeScene. If you use managed DB services like Amazon RDS or Azure Database, make sure to deploy them in the same region.
Run the Standalone CodeScene Application
Install the Supporting Tools
You need the following prerequisites to run CodeScene as a standalone application:
A Java run-time (or JDK if you run from the command prompt), 64-bit version, at least Java 1.8 u162. You ensure you have the right Java version by typing
java -versionin a command prompt.Have a Git client on your path since the tool will assume there’s an executable named git somewhere. Your Git client has to be at least version 2.32. You ensure you have the right Git client version by typing
git --versionin a command prompt.SSH client for use with Git when accessing repositories protected by a pair of public/private keys.
Please note that you can specify a custom Git client in the Configuration section once you login to CodeScene.
See also Configure your Environment for Git SSH key instructions.
Start CodeScene
You start CodeScene by launching the standalone JAR:
java -jar codescene.standalone.jar
This will launch a web application that listens on port 3003 (you can
override that by setting a different port through the environment
variable CACS_RING_PORT.
Once you’ve launched the codescene.standalone.jar you just point your web browser to localhost:3003 to access CodeScene.
Define the Root Paths for Persistent Data
CodeScene creates a local database for the analysis configurations.
By default the database file resources/caacs_enterprise.db.mv.db
is created in the working folder (that is, the directory where you run CodeScene).
You can override the default and provide a custom path through the environment variable CODESCENE_DB_PATH.
Note that you need to specify a complete file name.
As an example, if you specify /User/Services/CodeScene/configuration,
CodeScene will create a persistent database file named /User/Services/CodeScene/configuration.mv.db.
CodeScene will also need access to a writeable file system where it can store analysis results and cloned Git remotes. In some environments (e.g. Docker) you might want to constrain those paths so that users don’t specify paths to a non-persistent storage. You do this by two optional environment variables:
CODESCENE_ANALYSIS_RESULTS_ROOT: Specifies the root path to where all analysis results will be written. CodeScene auto-generates a folder for each analysis project.CODESCENE_CLONED_REPOSITORIES_ROOT: Specifies the root path to where Git remotes will be cloned locally. CodeScene auto-generates a folder for each analysis project.
The advantage of specifying these two optional environment variables is that the user won’t have to deal with configuring the result paths – it’s automated – and analysis results are always stored to a known partition.
Configure the available Memory
RAM is a critical resource for CodeScene. We recommend at least 4 GB of RAM. If your codebase has large files or you analyze large repositories you might need more memory.
The Java’s virtual machine (JVM) has a system dependent maximum for “max heap” size that is typically 1/4 of RAM. You can set the max heap size to a larger value via -Xmx or -XX:MaxRAMPercentage (50-60 is a good value - we use 60 in our Docker image).
On large codebases with large hotspots (e.g. thousands of lines of code in each file) you also want to increase
the stack size for the JVM to allow efficient code health calculations. You do this with the -Xss flag.
Here’s an example that shows how to allocate 60% of RAM as max heap size and 2 MB for each thread’s stack:
java -XX:MaxRAMPercentage=60 -Xss2m -jar codescene.standalone.jar
Note that the order of the arguments matter in this case (-jar must come only after the other flags).
Avoid missing stack traces
In some situations, the JVM skips stack trace generation and you won’t get full stack strace details which may make troubleshooting more difficult. You’ll find a message indicating this happened in the logs, e.g.:
java.lang.ClassCastException
Stack trace of root exception is empty; this is likely due to a JVM optimization that can be disabled with -XX:-OmitStackTraceInFastThrow.
You can disable this optimization and make sure stack traces are always visible by using the -XX:-OmitStackTraceInFastThrow flag when starting the application:
java -XX:-OmitStackTraceInFastThrow -jar codescene.standalone.jar
Optional: Run CodeScene in Kubernetes
Finally – and entirely optional – the CodeScene standalone JAR could also be run on Kubernetes. This might be an option if your organization already uses Kubernetes as a container management tool.
Follow the instructions here to setup CodeScene on Kubernetes.
Optional: Specify a Path Prefix
In some network configurations, it may be necessary to access CodeScene with a path prefix, for example as internal.example.com/codescene. This might arise when CodeScene is one of several services running on the same server or it is not possible to attribute a dedicated subdomain for CodeScene. While a proxy server can be configured to correctly direct incoming requests, all the links in CodeScene, by default, are relative to the root path, /.
To avoid this, CodeScene can be run with the CODESCENE_PATH_PREFIX environment variable. The value supplied will be prepended to all internal CodeScene links. If used, the pass prefix value should begin with a slash but contain no other slashes, spaces or non-alphanumeric characters besides - or _. Thus, for internal.example.com/codescene, CODESCENE_PATH_PREFIX would be set to /codescene.
(Note that this variable should not be used when running in Tomcat.)
Run CodeScene in Tomcat
CodeScene is delivered as a WAR file (Web application ARchive). We recommend that you deploy it using Tomcat (https://tomcat.apache.org/index.html).
Specify a file folder for the database
CodeScene uses an embedded database. That means, you don’t have to install any database or drivers yourself. However, you need to specify a path to a file folder where CodeScene is allowed to store its database. Here’s how you configure Tomcat to do that:
Open the file
context.xmllocated under the conf directory in your Tomcat installation.Add an
<Environment>tag to context.xml that specifies the path to a folder you want to use for the database (see the example below).Save context.xml.
Here’s an example on how context.xml may look on a Windows installation (note that you need to modify the path to fit your environment):
<Context>
  <WatchedResource>WEB-INF/web.xml</WatchedResource>
  <WatchedResource>${catalina.base}/conf/web.xml</WatchedResource>
  <Environment name="empear.dbpath"
               value="C:\\some\\path\\to\\the\\database\\empear.codescene"
               type="java.lang.String"/>
</Context>
In case you run on a Linux-based system, you just specify a different path format. For example:
<Context>
  <WatchedResource>WEB-INF/web.xml</WatchedResource>
  <WatchedResource>${catalina.base}/conf/web.xml</WatchedResource>
  <Environment name="empear.dbpath"
               value="/Users/adam/Documents/Empear/deployment/empear.codescene"
               type="java.lang.String"/>
</Context>
NOTE: Please ensure that Tomcat has write access to the folder you specify.
DB username and password
Optionally, you can specify a custom username and password to access the database. By default, CodeScene uses the ‘sa’ user with an empty password.
Add empear.dbuser and empear.dbpassword to the Context environment properties
to customize DB username/password.
Optional: Other Database Engine
When running in Tomcat, you can configure CodeScene to use one of the following db engines: h2 (default), mysql, mariadb. CodeScene uses the following additional Context environment properties when connecting to the database:
empear.dbengine- “h2” (default), “mysql” or “mariadb”empear.dbhost- default: “localhost”empear.dbport- used only for MySQL and MariaDB, default: 3306empear.dbname- default: “codescene”empear.dbsslmode- sslMode for MySQL.empear.dbenabledtlsprotocols- default: “TLSv1,TLSv1.1,TLSv1.2”, enabledTLSProtocols for MySQL.
You can also use standard CodeScene DB environment variables as documented in DB Configuration.
Deploy the codescene.war
Once Tomcat is up and running, with your modified context.xml, you just
copy the codescene.war to the webapps folder in your Tomcat
installation.
Access CodeScene
By default, Tomcat will launch CodeScene on port 8080 and at the path /codescene/. If you’re logged in on the server, you access the application on http://localhost:8080/codescene/login. You should see the activation screen in your web browser (see Fig. 1).
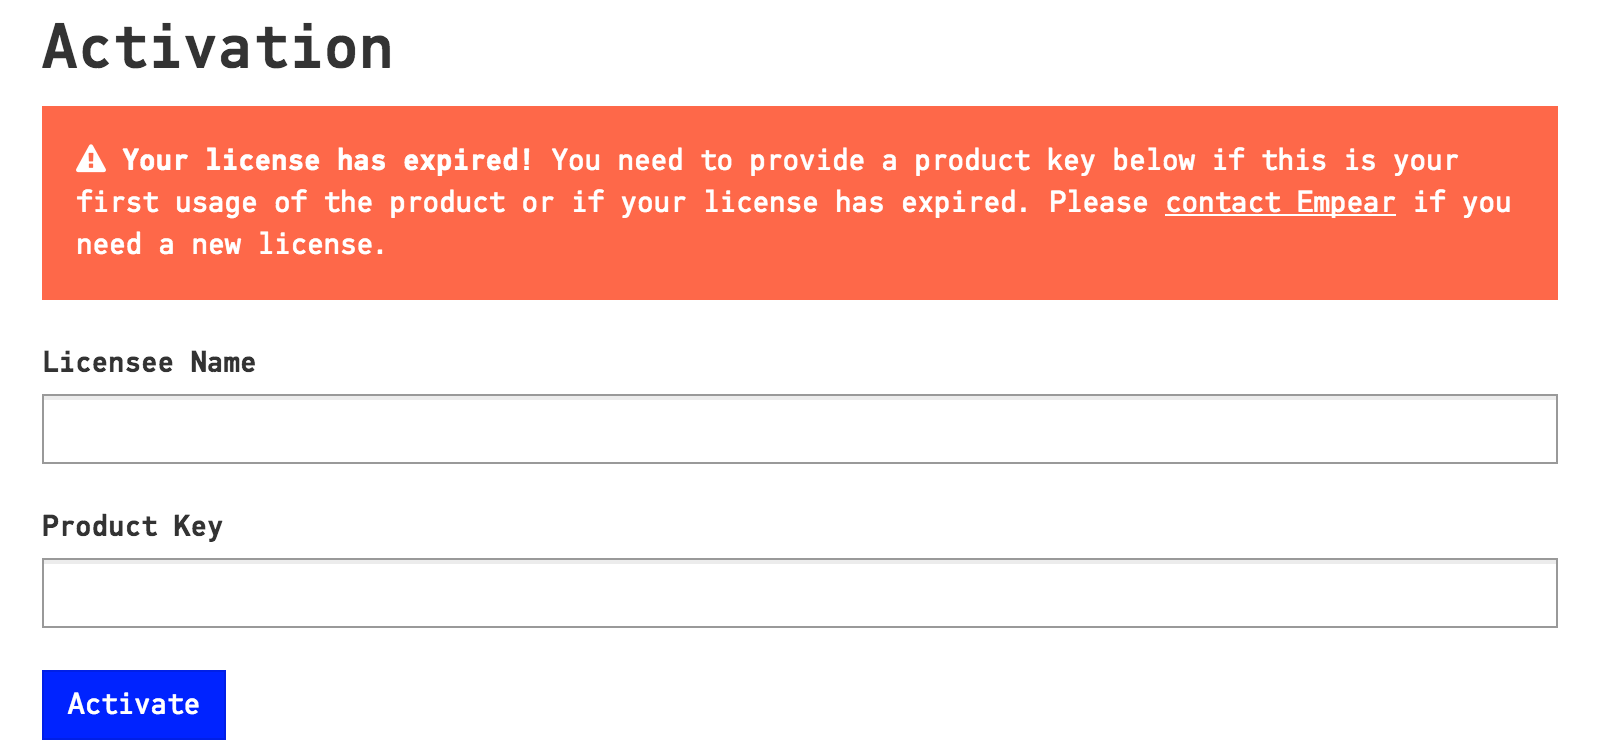
Fig. 1 The first time your login you are prompted to activate the application.
Enter the credentials you received in your license file. You’re now ready to login (see Fig. 2).
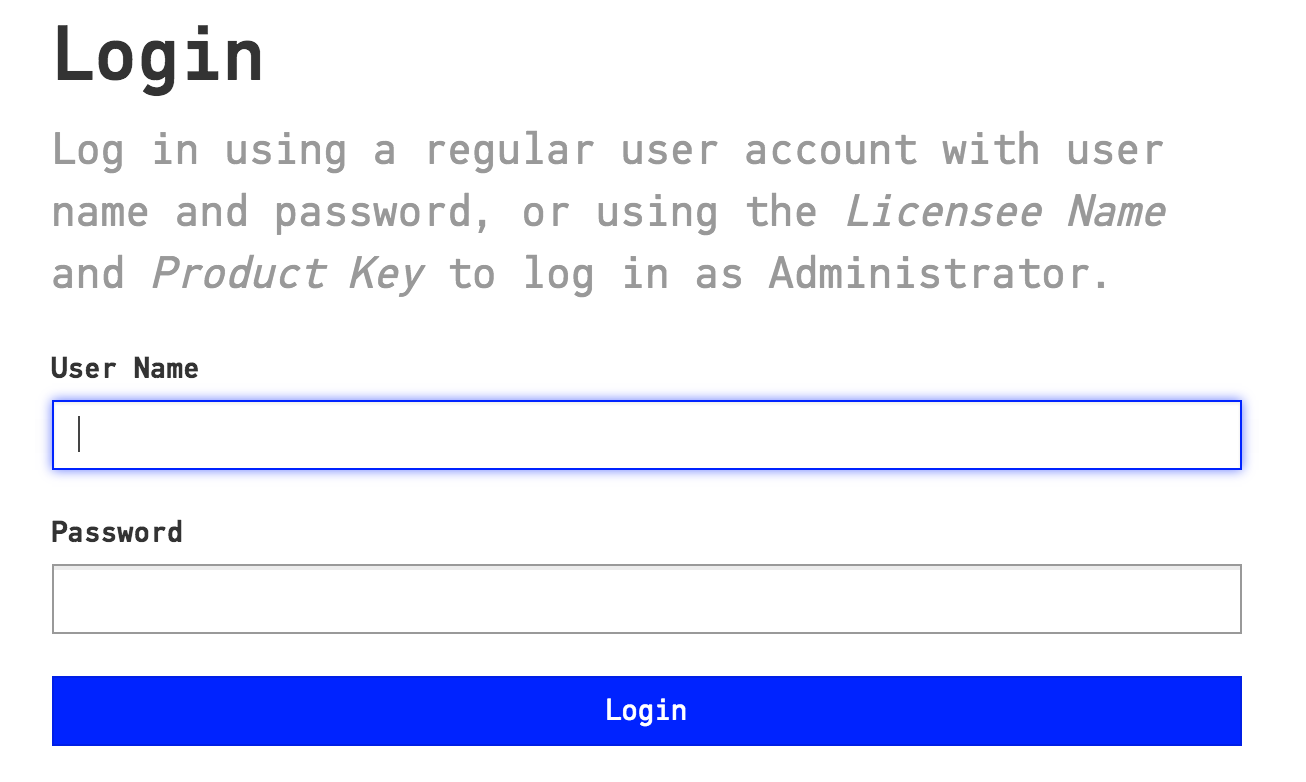
Fig. 2 Once you’ve activated the tool you’re ready to login.
The first time you login, you use the same credentials to login as you used to activate the application. That is, give your CodeScene Username as User Name and your CodeScene License Key as Password.
You’re now up and running with CodeScene!
Configure additional users
You are granted administration privileges each time you login with your license credentials (note that you can do that at any time, for example to administrate users).
You can add new users and assign them roles in the global configuration. Users and Roles describes this in greater detail.