Project Configuration
Specify the Git Repository to Analyze
Your first step is to tell CodeScene where your code is. There are six different ways of doing that:
1. Specify the paths to your local, physical Git repository, which has to be on the same machine as CodeScene runs on. The path you specify has to be to the root folder of your repository (i.e. the folder that contains your .git folder).
2. Let CodeScene scan a folder on your file system for repositories to analyze. You’ll be prompted with the results and are free to ignore the repositories you want to exclude. This option is useful in a multi-repository project.
3. Specify the URLs to Git remotes. CodeScene supports the protocols specified by Git clone: ssh, http, and git. CodeScene will clone the remotes to a local folder that you specify in the configuration as illustrated in Fig. 187. Note that CodeScene will re-use a local Git repository if there’s an existing clone on the path you specify. Also note that you need to have a an ssh-key that lets the CodeScene (system) user access your remote repositories.
4. Clone an existing analysis configuration. CodeScene copies all your configuration options – filters, repository paths, exclusions, teams, ex-developer configuration, etc – to a new project. From here those two projects (the original and the clone) are completely independent and changes to one of them do not affect the other.
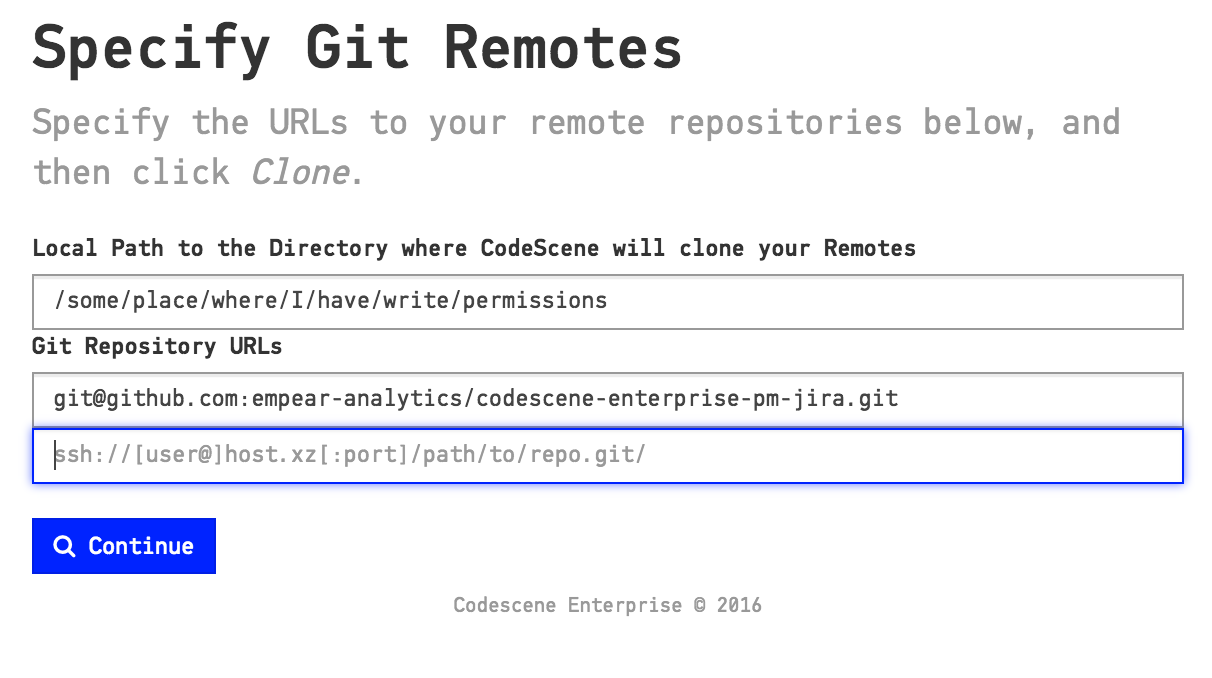
Fig. 187 Let CodeScene clone your Git repositories through their URL.
Finally, note that you cannot mix local repository paths with URLs to remote Git repositories in a single analysis project.
5. Use Google’s Repo tool. You provide CodeScene with the URL to the repository containing your project’s manifest file. CodeScene will then initialize a local directory as a Repo project and clone all of your Git repositories.
With a Repo-based project, you can switch between branches of the manifest to check out different versions of your project. Branch selection inside the project’s Git repositories can be controlled through the manifest file.
6. Import a project configuration that has been created by exporting the configuration of a project from this or another CodeScene instance.
Analyze Projects organized in Multiple Git Repositories
There’s a recent trend towards organizing the source code of larger systems in multiple Git repositories. For example, you may have the code for your user interface in one repository, the code for your service layer in another repository and perhaps even a Git repository dedicated to your back end mechanism. Another typical example is Microservices where each service is deployed according to its own life cycle. In that case, organizations often chose to use one Git repository per service.
CodeScene supports an analysis of multiple repositories at once. All you have to do is to specify the paths to them:
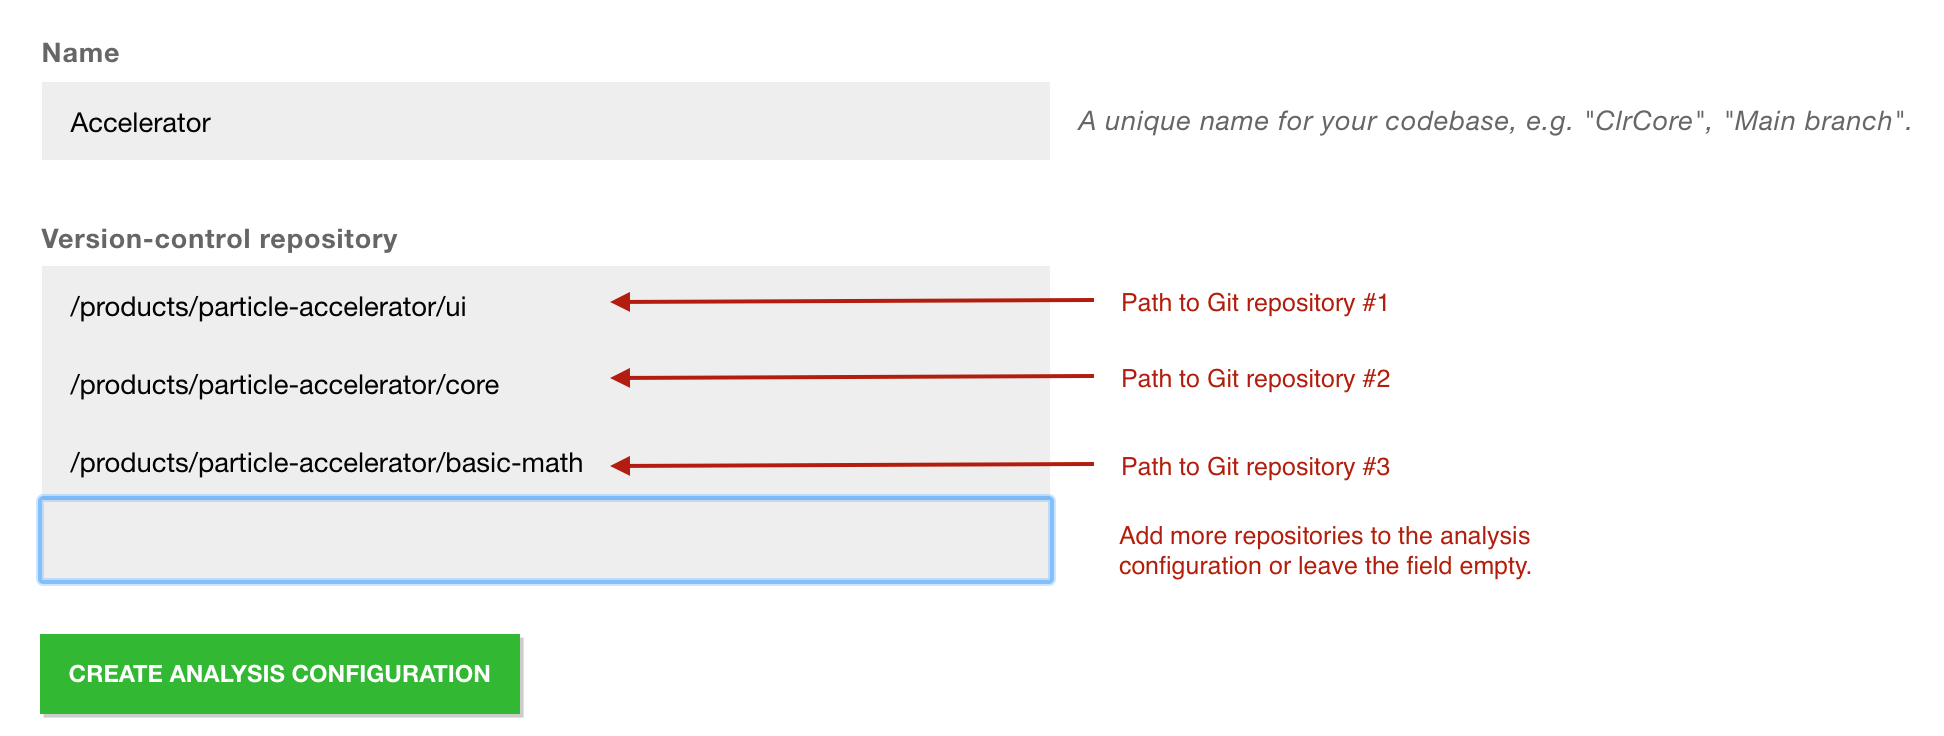
Fig. 188 Configuration of multiple repositories.
The screenshot above shows three repositories that belong to the same product. During an analysis, CodeScene will analyze the evolution of the code in all those repositories as though they were in the same physical Git repository.
You can specify as many repositories as you want and remove one at any time (just erase the text in that box). However, a word of warning: do NOT attempt to analyze unrelated repositories in the same configuration. First of all it’s a breach of the license agreement. Worse, you won’t get useful results since many of the basic metrics, like Hotspots, are relative metrics.
Auto-Import Repository Paths
Specifying one or two repositories by hand is straightforward. However, some systems consists of hundreds of repositories. In that case you want to use the auto-import feature.
The auto-import feature lets you specify a root path to where your repositories are located. Here’s what it looks like:
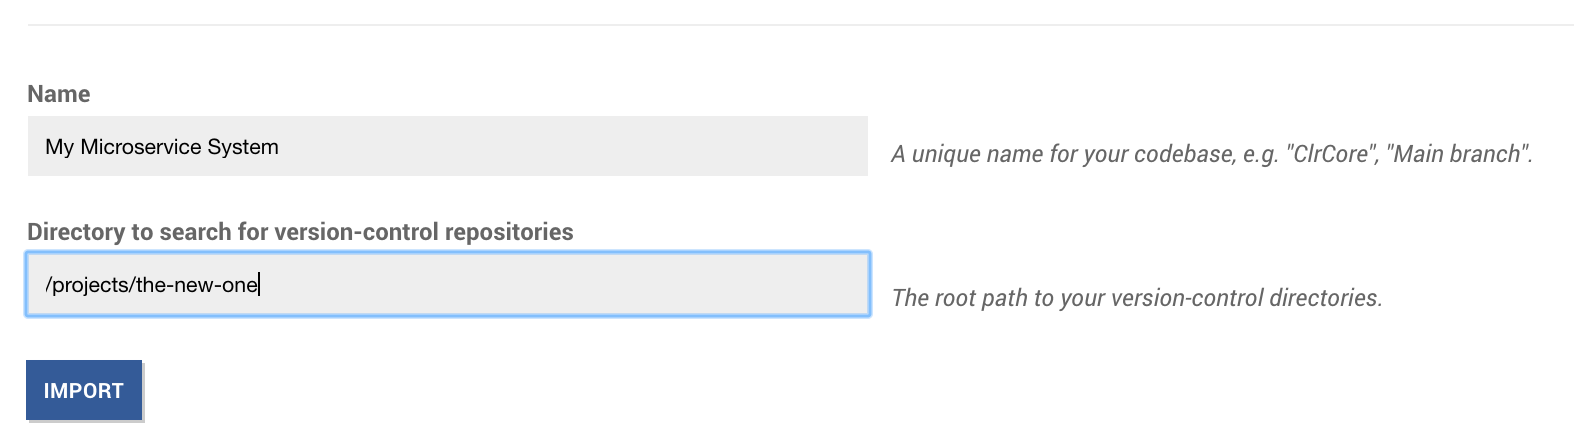
Fig. 189 Automate the import of multiple repositories.
CodeScene will scan the path you provide to discover any Git repositories. The discovered Git repositories are presented in a list. Note that you can add additional repositories manually or remove the once you want to exclude:
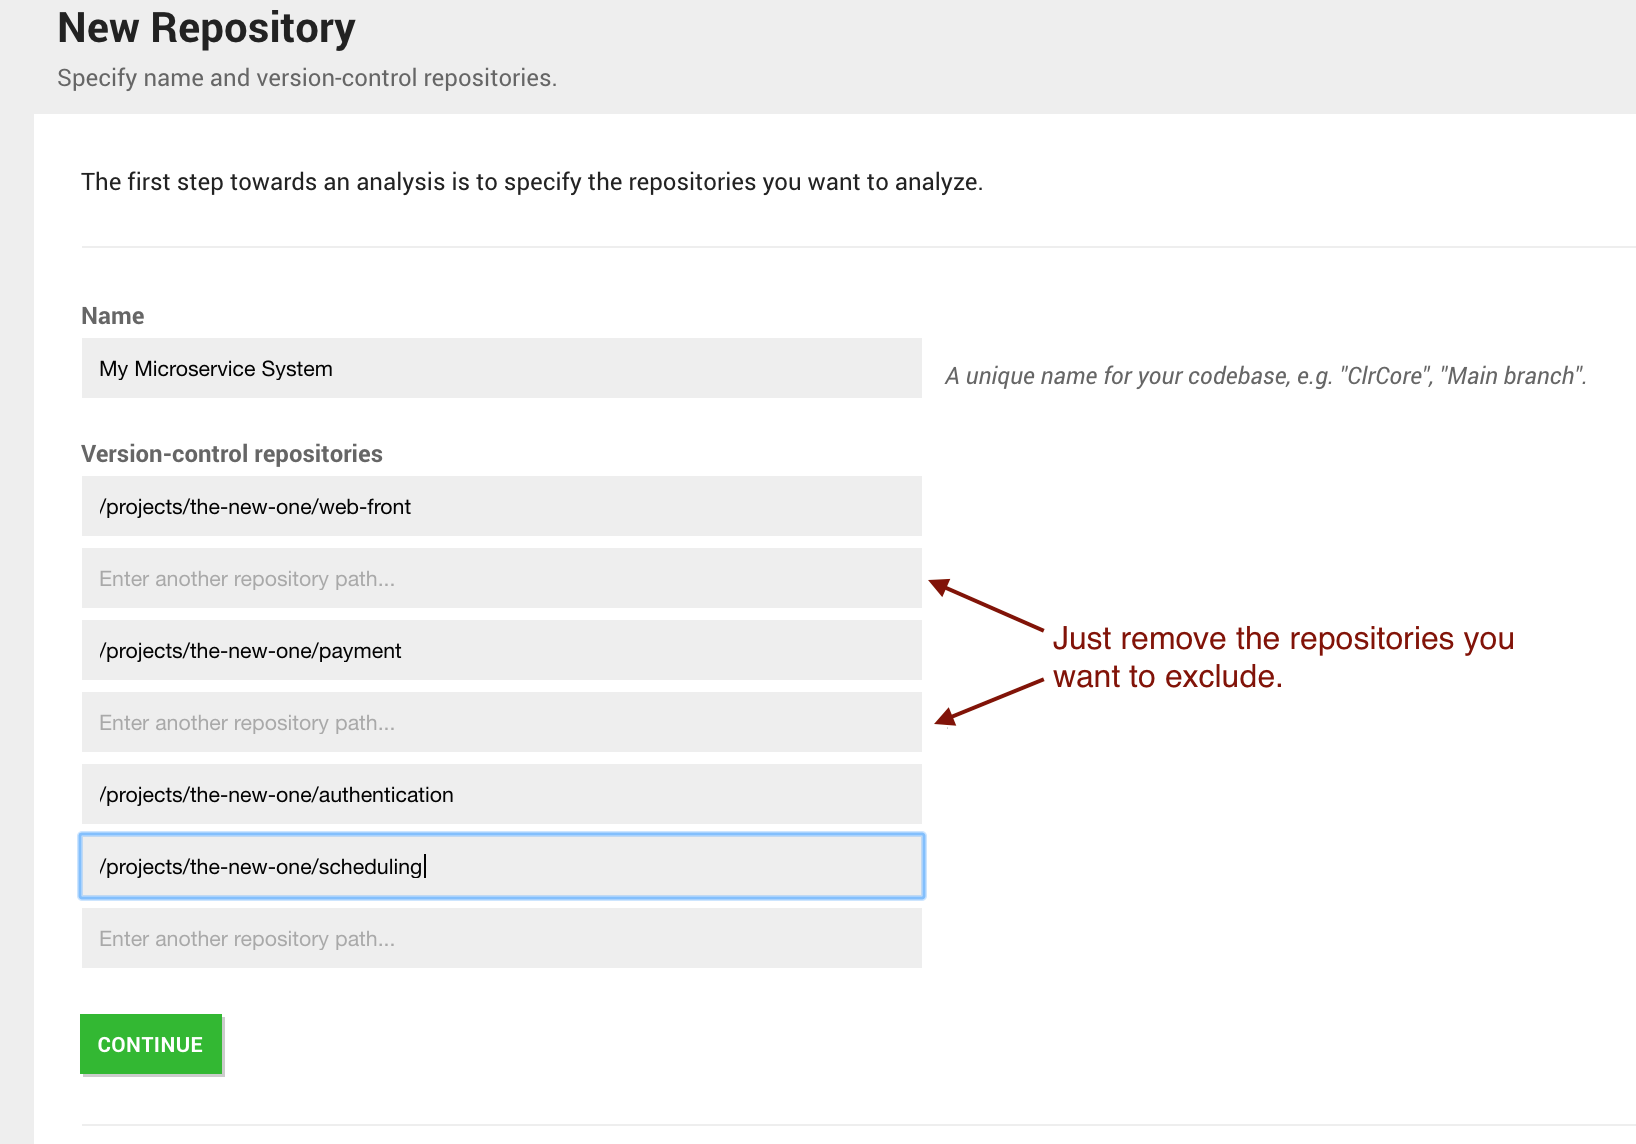
Fig. 190 The result of auto importing multiple repositories.
From here you just press Continue to proceed with the configuration of your analysis. The rest of the workflow is identical to the case where you specify repositories manually.
Tune the House-Keeping Options for Analysis Results
CodeScene is designed to run continuously to monitor your system. That also means you will accumulate lots of historic analysis results that occupy space on your host machine.
CodeScene lets you specify a house-keeping strategy that automatically cleans out old historic results, as illustrated in Fig. 191.
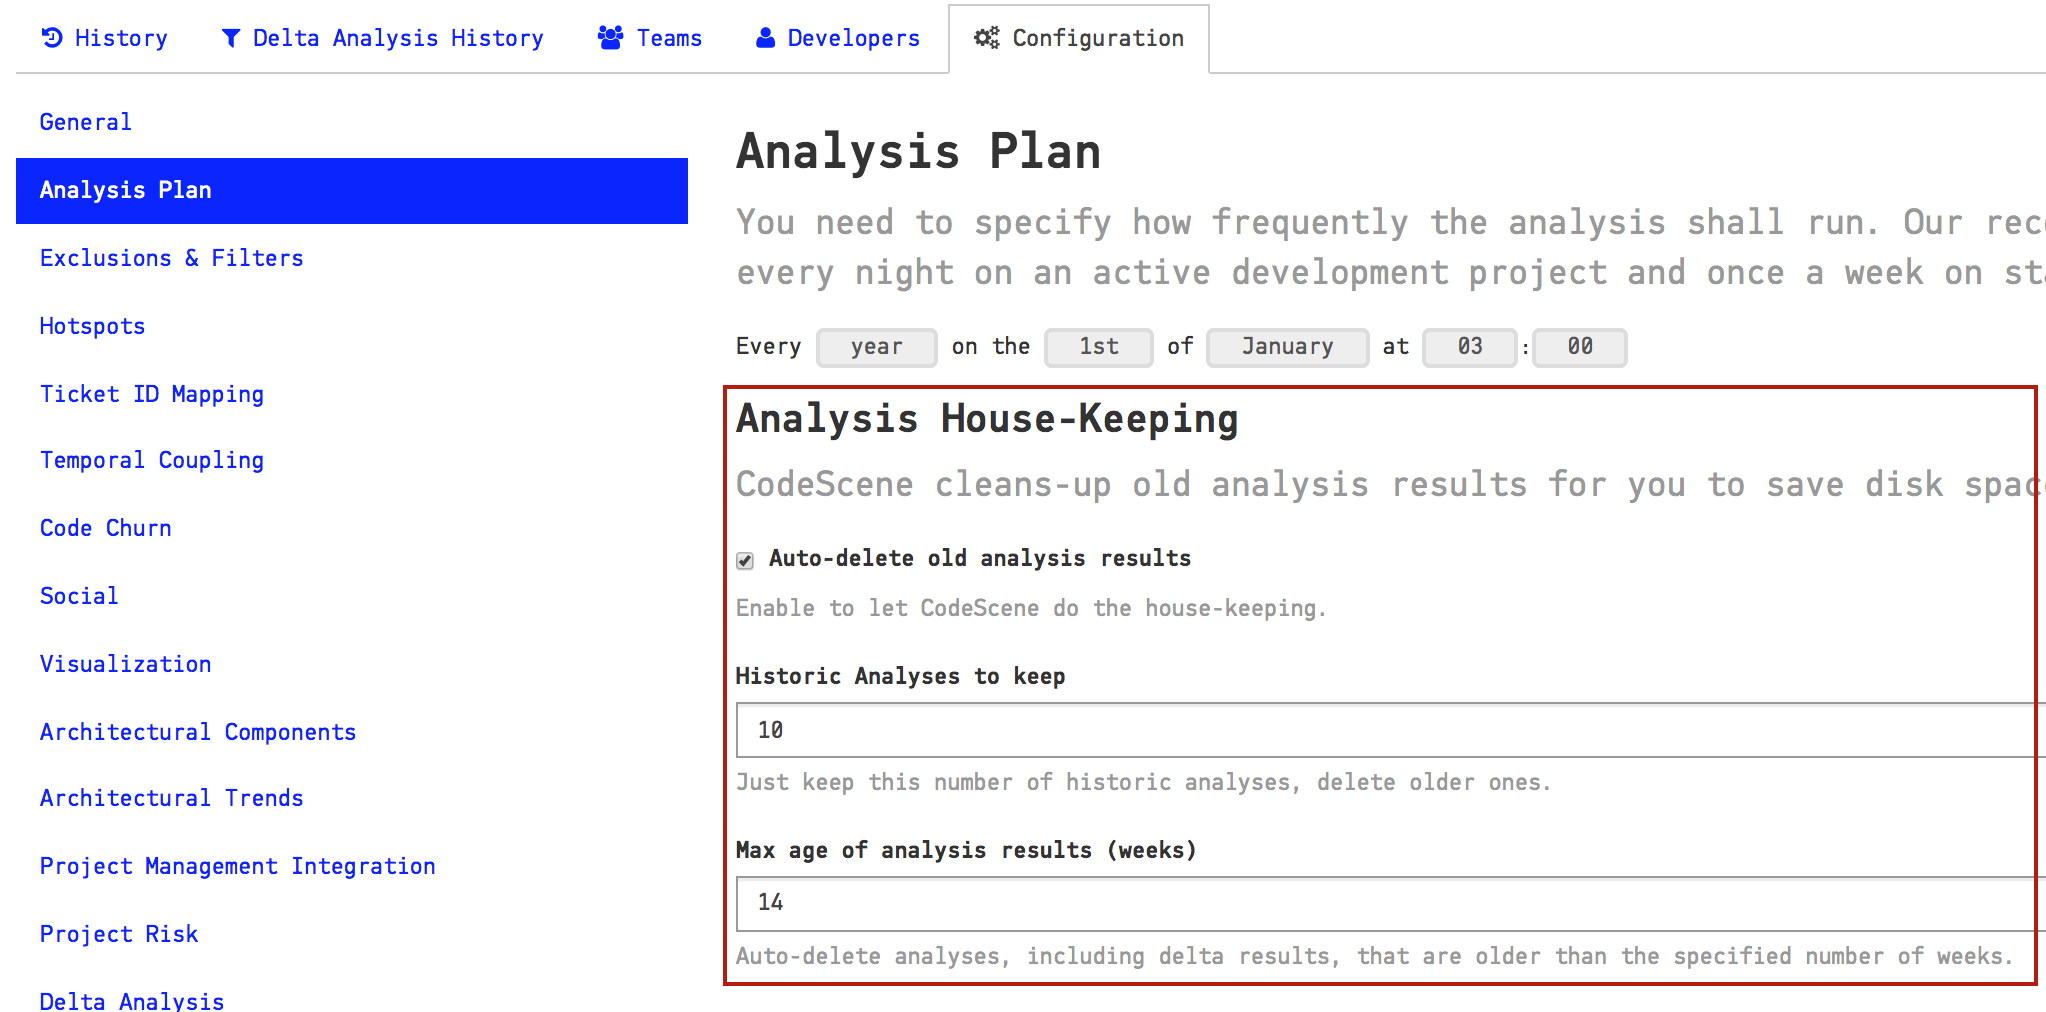
Fig. 191 Specify how much history you want to keep.
Measure Temporal Coupling across Multiple Repositories
The normal temporal coupling metric considers two files coupled if they tend to change in the same commits. This won’t work if your codebase is split across multiple repositories. Instead, you want to aggregate individual commits into logical commits. CodeScene supports two different strategies for aggregating commits:
- By Author and Time
- When you specify this option, the tool will consider all commits by the same author on the same day as a single, logical commit. This option is a heuristic that works well in the absence of a Ticket ID in your data.
- By custom Ticket ID
- This option uses an identifier in your commit headers. All commits that refer to the same identifier will be considered one logical commit.
The second option, By custom Ticket ID, is the preferred method. Fig. 192 shows the options in the repository configuration section Temporal Coupling.

Fig. 192 There are two available strategies for aggregating commits.
To aggregate by custom Ticket ID, you need specify a Ticket ID Pattern, in
the Ticket ID Mapping section (see Fig. 193). The pattern
is used to extract the Ticket ID from the commit message. The example pattern
in Fig. 193 will extract all identifiers that start with the
text ISSUE- followed by at least one digit. For example, the commit
message ISSUE-42 will result in 42 as the extracted Ticket ID.

Fig. 193 Configure a pattern to extract a Ticket ID.
Note that CodeScene will still calculate normal temporal coupling on a single commit basis. You want that in order to spot unexpected dependencies between files in the same repository. The temporal coupling results for the logical commits discussed above are presented in a separate analysis view.
Temporal Coupling Exclusion Filters
You might have files that you expect to be temporally coupled, for example tests and the corresponding units under test, or matching .c and .h files. To exclude these coupling from visualization by default, go to the “Temporal Coupling” section of the project configuration and add “Temporal Coupling Filters” for the patterns you want to exclude, as shown in Fig. 194.
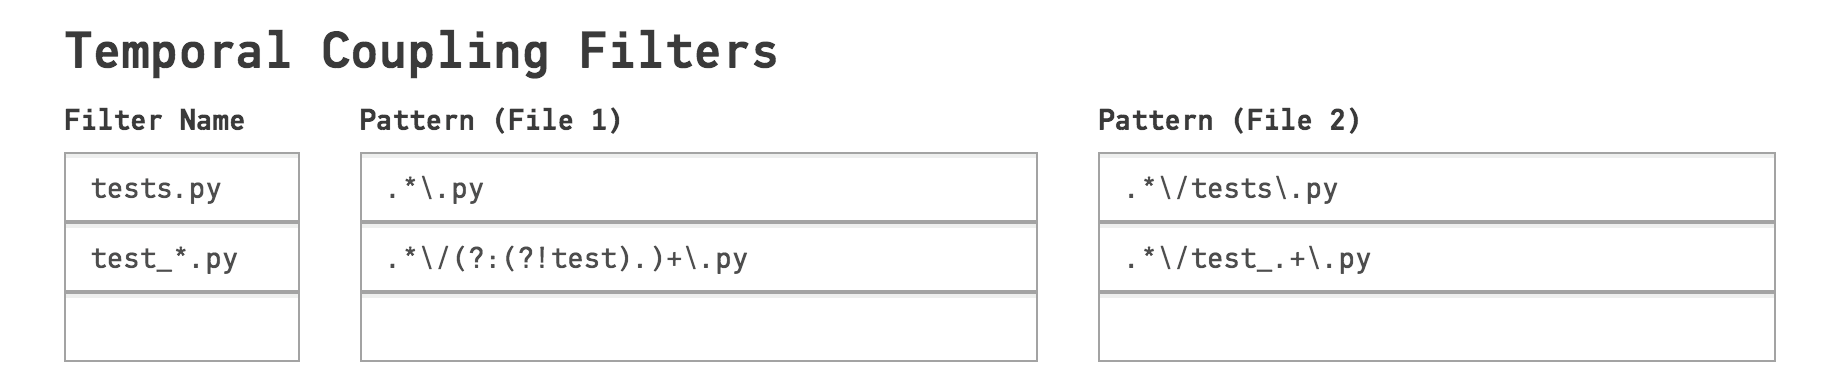
Fig. 194 Configure temporal coupling filters for expected file couplings.
Each filter has a name, that can be anything you like, and patterns for coupled file paths. The patterns are a regular expressions. When a pair of coupled files match the patterns, in either direction, they are excluded by the filter.
All filters are tried in sequence, and if any filter hits a coupled pair, the pair is excluded. Some useful examples of patterns are:
| Pattern (File 1) | Pattern (File 2) | Description |
|---|---|---|
.+\.(?:c|cc|cpp|cxx) |
.+\.(?:h|hh|hxx) |
C/C++ includes, e.g. gc.cpp and util.h |
.+\/(.+)\.java |
.+\/(.+)Impl\.java |
Java “Impl” pairs, e.g. Thing.java and ThingImpl.java |
.+\/(.+)\.cs |
.+\/I(.+)\.cs |
C# interface pairs, e.g. IComponent.cs and Component.cs |
.*\/(?:(?!test).)+\.py |
.*\/test_.+\.py |
Python files and tests, e.g. foo/a.py and tests/test_a.py |
If any of the patterns have capturing groups, both matches must generate the same number of captures, with equal values, to trigger the filter. Note that non-capturing groups and negative look-ahead in regular expressions can be useful if you want to write advanced filters, and only trigger filters on corresponding files in corresponding directories.
Linking to an External Ticket System
If you have a Ticket ID Pattern configured, and a way to deep-link to tickets by the matched identifiers, you can configure a Ticket URI Template to enable links in analysis views. That way you will be able to quickly navigate from Code Churn by Task to the external ticket system, and view more details there.
The Ticket URI Template is based on the URI Template format (RFC
6570), with support for the single
expression {ticket-id}. The matched ticket value, i.e. the captured value
of the regular expression group, is used as {ticket-id} for hyperlinks.
For example, if your Ticket ID Pattern is #(\d+), and your Ticket URI
Template is https://example.com/tickets/{ticket-id}, a commit containing
the string #1234 will result in a hyperlink to
https://example.com/tickets/1234.
Some useful examples of Ticket ID Patterns and Ticket Template URIs are:
- GitHub:
#(\d+)andhttps://github.com/your-org/your-project/issues/{ticket-id} - JIRA:
(\[A-Z]{2,}-\d+)andhttps://example.com/jira/browse/{ticket-id} - Trello (Card Numbers):
CARD-(\d+)andhttps://trello.com/search?q={ticket-id} - Trello (Card Short IDs):
CARD-(.+)andhttps://trello.com/c/{ticket-id}
Detect Patterns in Code Comments
Exhaustive use of certain code comments indicate code smells. For example, a file that is filled with TODO comments is usually not that reassuring. On a similar notes, organizations might use static analysis tools and use code comments to suppress the findings. By configuring a set of patterns, you can use CodeScene’s virtual code reviewer to detect such patterns as shown in Fig. 195.
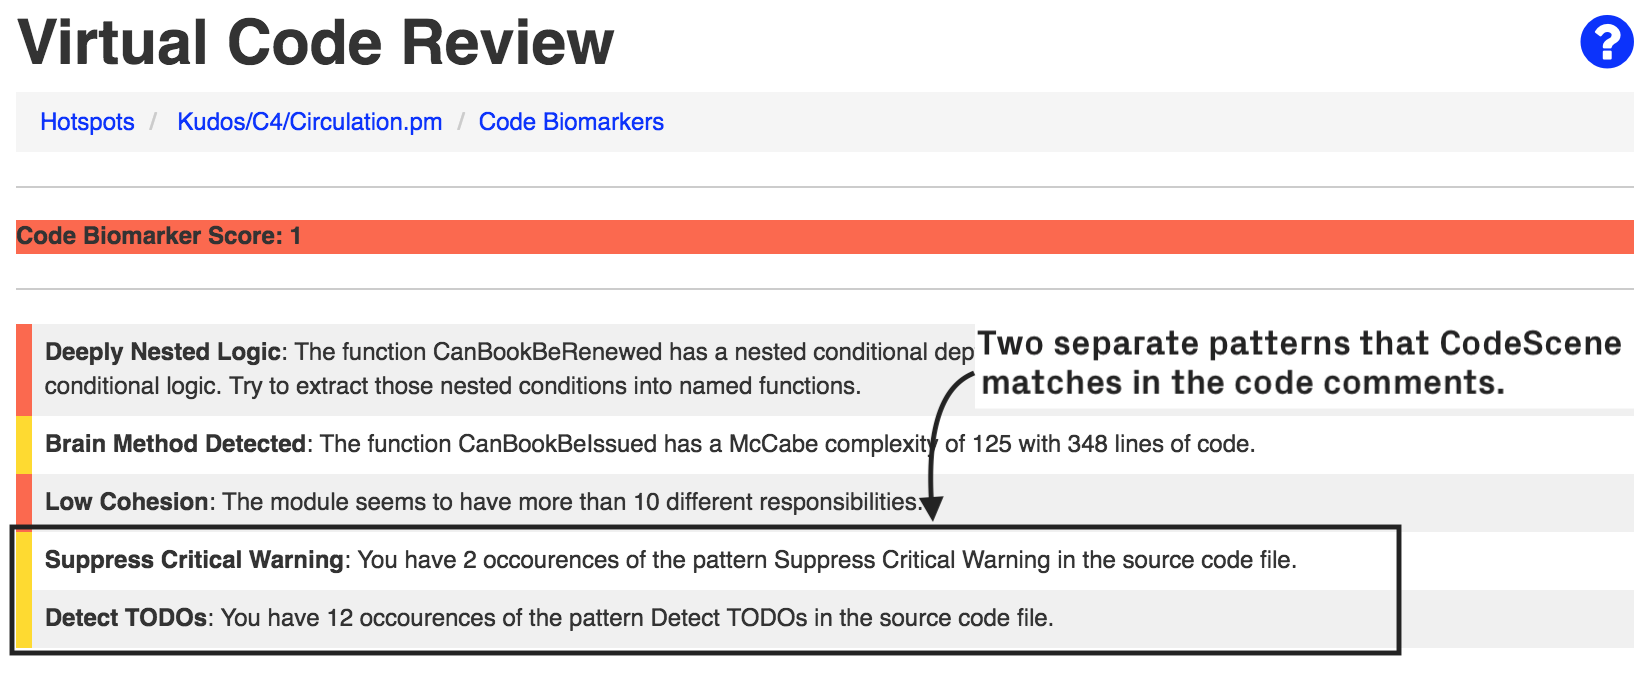
Fig. 195 Detect specific type of code comments.
The configuration is a bit special, but read along for examples – it’s not hard:
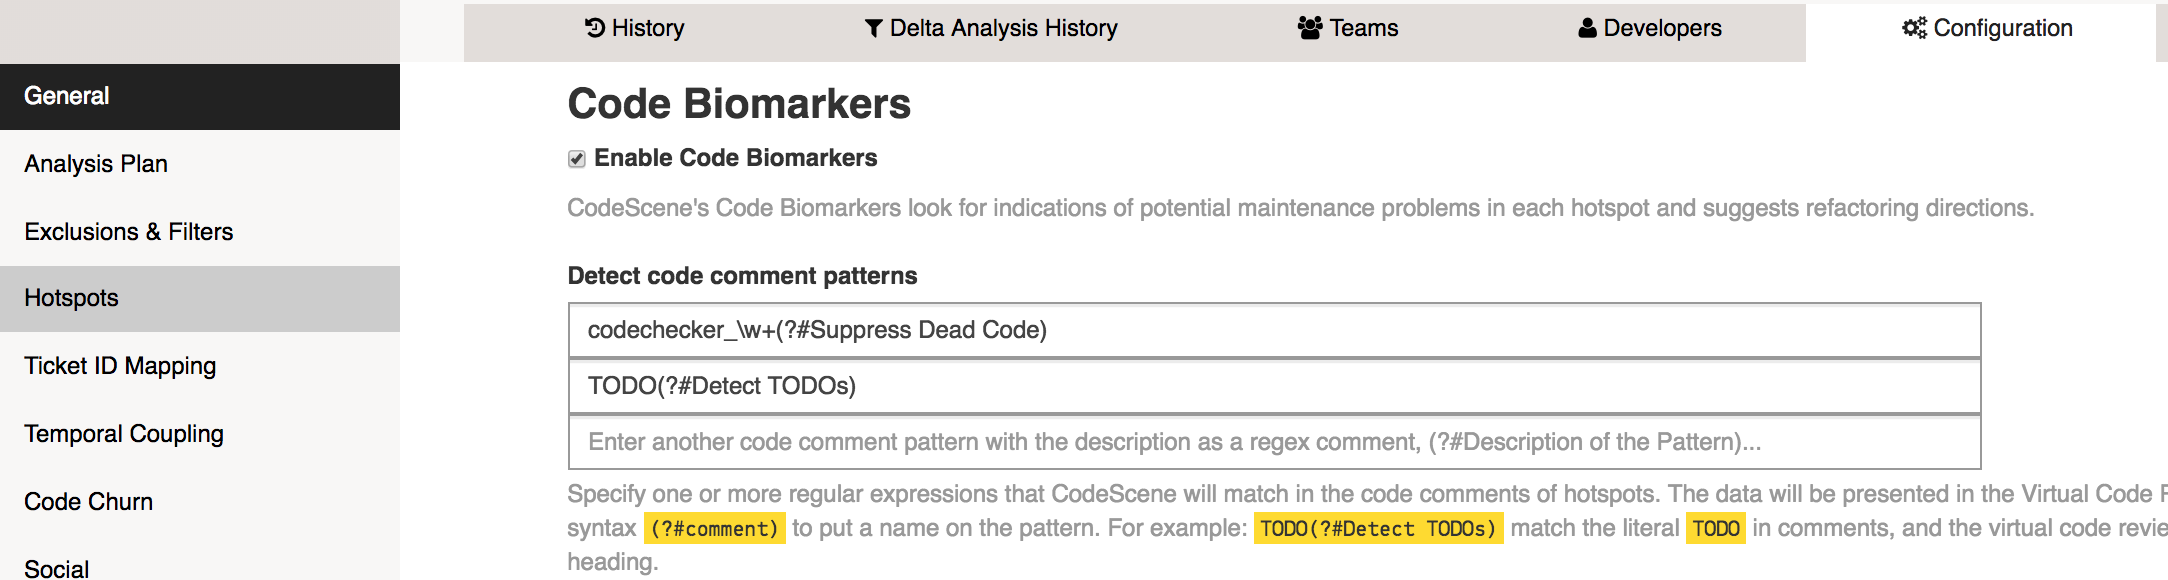
Fig. 196 Configure regular expressions to detect code comments.
Fig. 196 presents two patterns that CodeScene will match in the code comments of your hotspots. Each pattern consists of two parts, separated by the regex inline comment syntax, (?#comment):
- A regular expression to match in the code comments.
- A descriptive name of the content that the regular expression matches. This will be used in the virtual code reviewer.
In the first example, we match the expression codechecker_w+. That is, any code comment that starts with codechecker_ followed by a string such as _confirmed or _critical. We then add the descriptive comment (?#Suppress Dead Code). Note that only “Suppress Dead Code” makes up the name; the (?#…) syntax is only to embed the name in the regex.
The second example shows a simpler pattern where we match the literal string TODO in a code comment, and associate it with the label “Detect TODOs” which will then be displayed in the virtual code review.
Exclude Initial Commits from an Analysis
Some Git repositories start their life as an import of an existing codebase. If the previous history isn’t migrated together with the code, the author that does the initial commit of the existing codebase gets all the credit. This leads to a bias in the social analyses.
The solution is to exclude all contributions done as part of the initial commit. You specify those commits (fetch them from your Git log) in the project configuration as shown in Fig. 197.
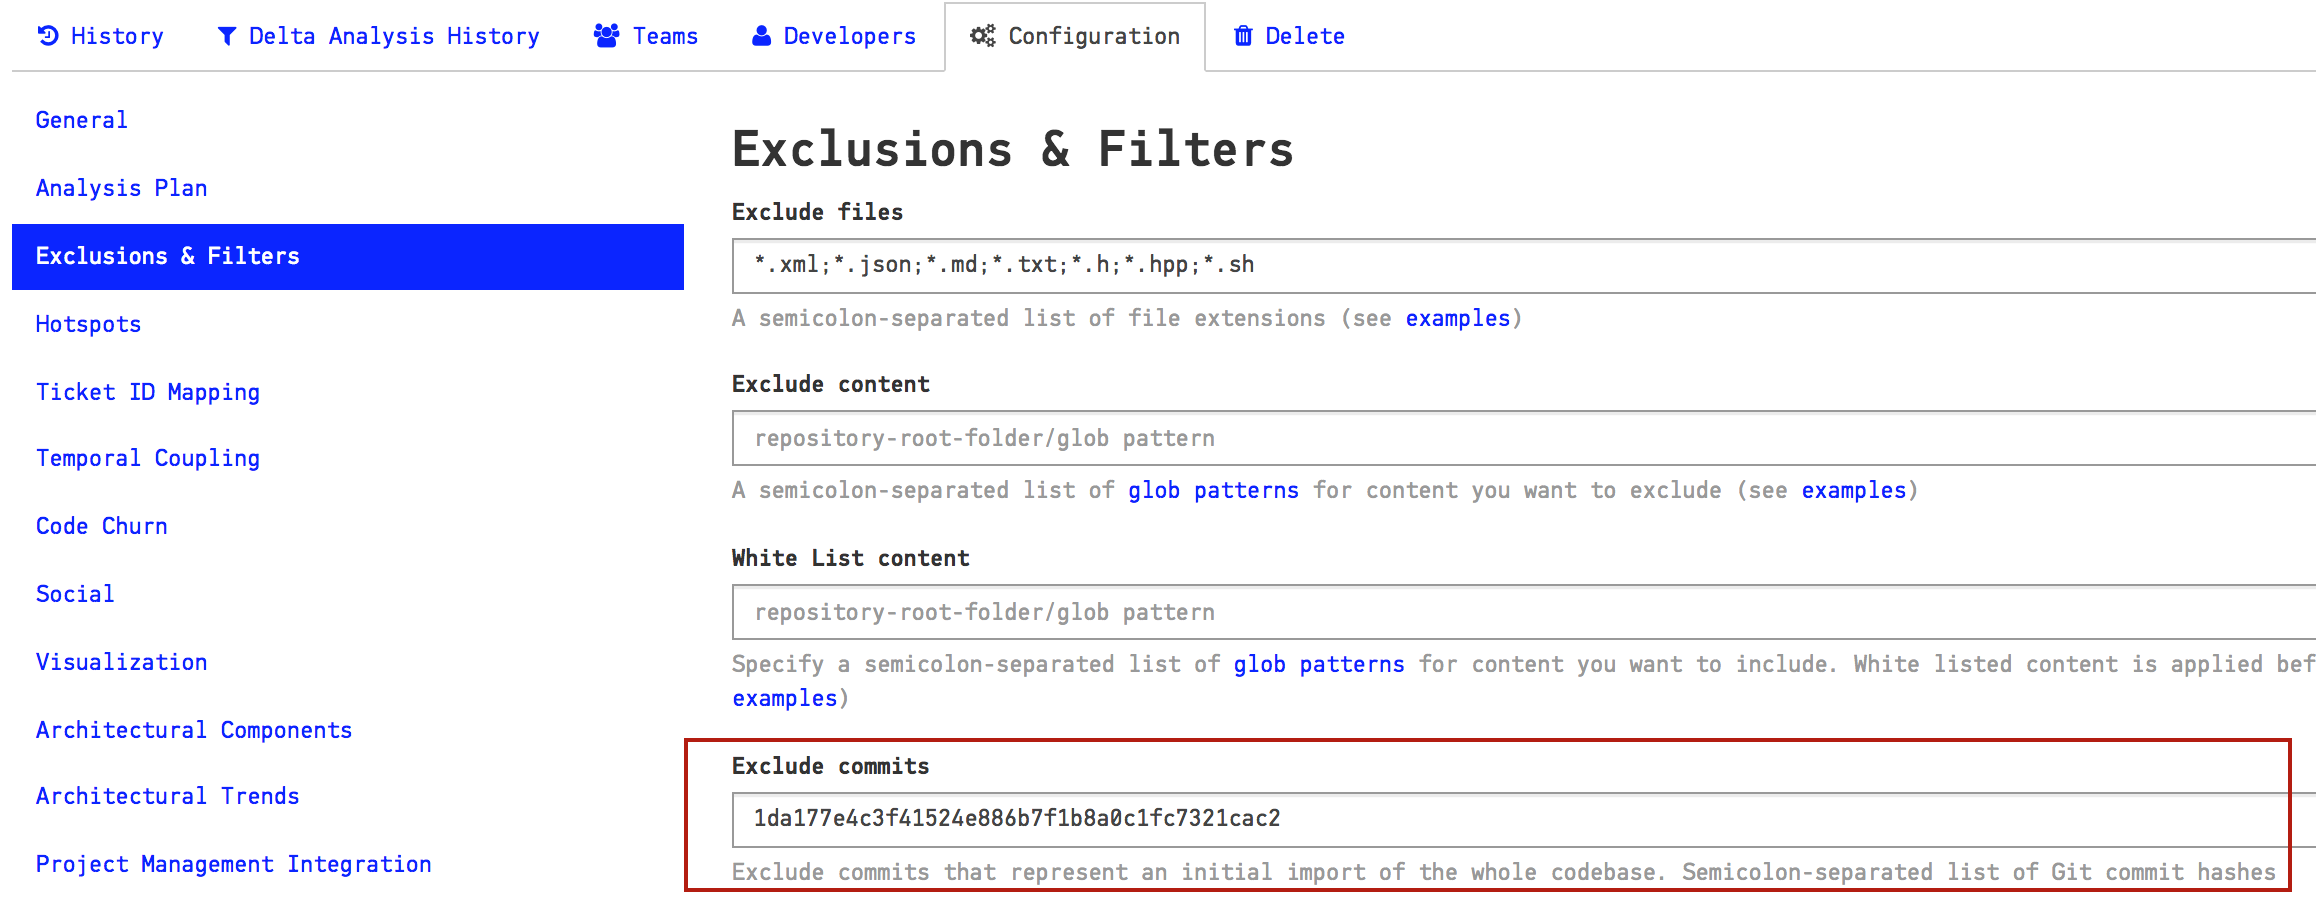
Fig. 197 Exclude specific commits from the analysis.
Exclude Files from an Analysis
An analysis will include all textual content in your repository. That means: you get an analysis of your build scripts, resource files, configuration files, test data, etc. While it’s a good practice to run an analysis of all content every now and then, there’s also the risk that you get too much noise in the analysis results. For example, you typically want to exclude auto generated content.
The Exclude Files option lets you specify a set of file extensions that will be excluded from your analysis:

Fig. 198 Exclude specific types of files.
CodeScene comes with a set of pre-defined exclusion patterns that should match the most common cases. You’re free to extend this set if you have additional file types that you want to exclude. Just remember to use a semi-colon (;) to separate each file extension you want to exclude.
Exclude Specific Files and Folders from an Analysis
You just learned how you can exclude certain types of files, no matter where they are located in the your codebase. But sometimes you’d like to exclude a particular file or, more often, a complete folder. For example, let’s say that you check-in third party code in your repository. You don’t want that code to obscure potential analysis findings in your own code.
There are two different ways to exclude complete folders and files:
- White list the content you want to include in the analysis. All other content will automatically be excluded.
- Black list the content you want to exclude.
You can specify both white- and black list content. The white listing will be applied first.
You specify a glob pattern to white list the content to include in your analysis as illustrated in Fig. 199.
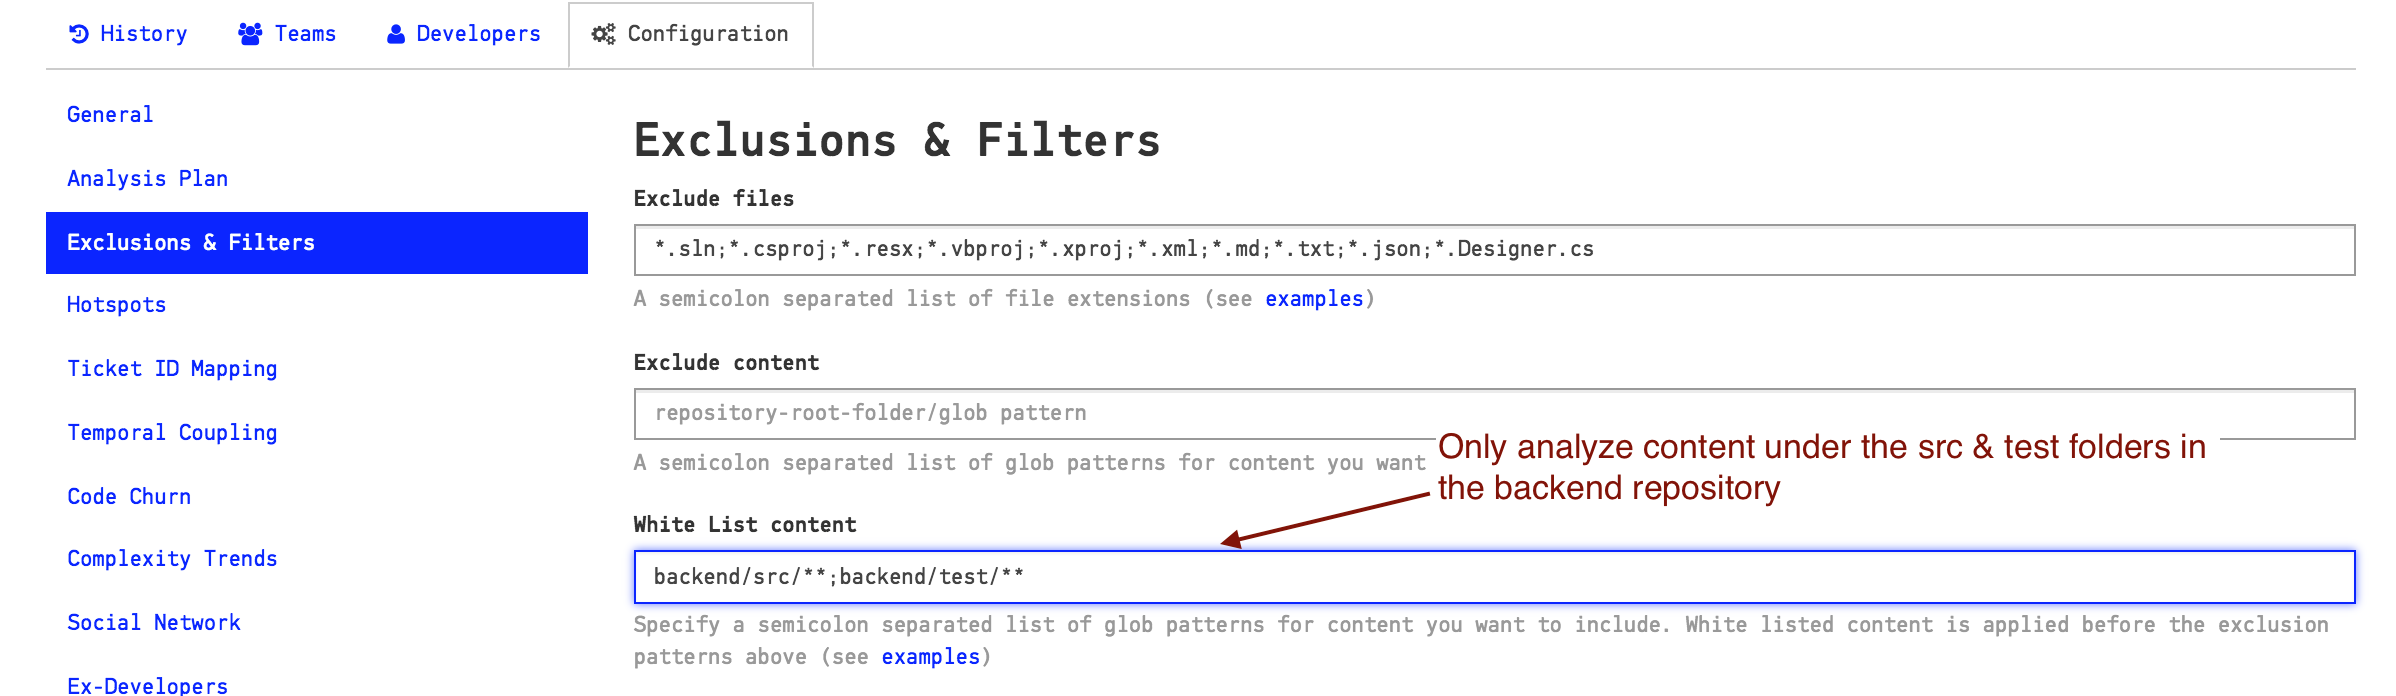
Fig. 199 Glob patterns to white list content.
You specify a glob pattern to Exclude Content from the analysis as illustrated in Fig. 200.
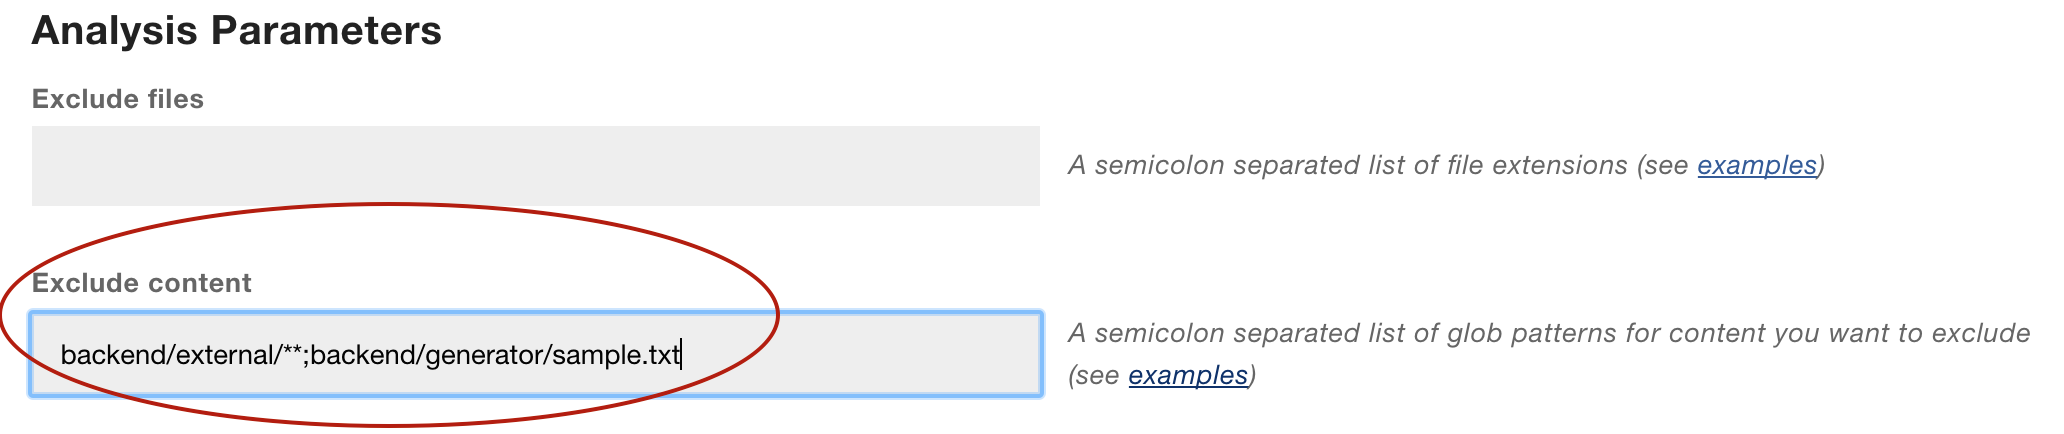
Fig. 200 Glob patterns to exclude content.
The example above will exclude all content under the external folder and the file samples.txt from the generator folder.
Note: You need to specify your exclusion paths using UNIX style path names. That is, use forward slashes as separators. Also note that the paths have to start with the name of your repository root. That is, if your Git repository is located in a folder named backend, as in the example above, you have to prepend that folder name to all your exclusion patterns. The reason for that is due to CodeScene’s support for multiple repositories where you have to be explicit about what repository you exclude things from.
There’s one exception to the rule that patterns have to specify the repository root. That’s the case when you want a pattern to apply across all repositories. For example, let’s say that you want to exclude all shell scripts in your test folder. In that case you specify a pattern like **/test/*.sh That is, your patterns are allowed to start with a wildcard too.
A Brief Guide to Glob Patterns
Glob patterns let you specify paths- and file names with different wildcards. CodeScene supports the following wildcards:
1. *: A single asterisk matches any string of characters. Use it to exclude or while list particular files. For example *.h will exclude all files with extension h. You can also use the single asterisk to specify glob patterns that apply to all your repositories in a multi repository analysis project. For example, the glob pattern */version.txt will match (and possibly exclude) the version.txt files at the top level of each of your repositories.
2. **: The double asterisk matches whole paths/directories. You use the double asterisk to exclude or white list content independent of the content’s location in your codebase. For example, the pattern myrepository/**/*.h will match all files with extension h in any directory in your repository. You can also use the double asterisk to match exclude or white list whole folders. Let’s say we want to exclude all our unit tests from an analysis and that those tests are located in the repository ‘coolstuff’. Here’s a pattern for that: coolstuff/test/**.
- ?: The question mark matches a single character.
Please note that all glob patterns are specified using UNIX style path names. That is, if you’re on Windows you do not use backslash to separate directory names, but rather the UNIX style forward slash. That is, the directory SomeRepo\Test is excluded by specifying SomeRepo/Test/**.
Specify An Analysis Period
CodeScene lets you specify how far back in time we go to mine your repository history. The actual analysis period you select depends on several factors:
- The activity in your project: Select a short analysis period, like 6 months, in a codebase with a lot of development activity.
- The information you want: If you want an overall view of potential maintenance problems, we recommend that you use a longer analysis period like a couple of years. If, on the other hand, you want to identify recent modifications to the codebase, your analysis period could be as short as just a couple of iterations, e.g. 1 month.
By default CodeScene uses three separate analysis periods depending on the type of information it analyses:
- Hotspot information uses a sliding window to avoid that historic – but now stable – hotspots bias more recent trends.
- The team-level analyses use a separate date. Specify the date of the last organizational change here.
- Individual knowledge metrics and trends should use the full history of your repository.
The rationale is that analyses on the level of individual developers, like knowledge maps and knowledge loss, need to take the full history of
the codebase into account in order to be accurate. You can disable this behavior and use the specified date for all analyses
by unchecking the box “Use the complete Git history for knowledge metrics” (see specify-analysis-date).
Similar, team-level analyses like coordination needs and Conway’s Law should ignore the historic activity of previous organizational structures, and you want to measure from the date where the current team structure got operational.
Finally, please remember that selecting an analysis time span depends on the questions you have. As such your choice depends on your context and is more of a heuristic than a science. Always start with an analysis of the full history when in doubt.
Visualization Options
CodeScene is capable of analyzing large codebases consisting of millions lines of code. However, the web browser you use to view the results isn’t always that performant. In particular, if you have a repository with several thousands of files, the Hotspot and Knowledge visualizations will become slow and painful to navigate.
If you experience that problem, consider to increase the thresholds in the Visualization section, shown in Fig. 201.
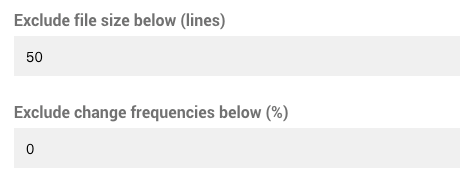
Fig. 201 Exclude small files from a visualization.
The first option simply excludes files smaller than your specified size from the visualizations. The second option excludes files that haven’t changed more often than the threshold you enter.
The rationale is that in a system of several thousand files, the small ones (1-100 Lines of Code) are probably not the most interesting ones. Thus, these should be safe to exclude.
Note that the visualization algorithm performs some checks to ensure that a hotspot, no matter how small, is included anyway so that you don’t miss some important result. Also note that the exclusion only applies to the visualization - the code is still included in the analysis.
Working with Repo
The Repo tool is often used for very large projects containing many separate but related Git repositories. A central Manifest XML file is then maintained to define the list of included projects.
CodeScene’s Repo integration makes it easier to analyze this kind of large project because you no longer need to enter each sub-project separately. Just point CodeScene at your manifest repository and CodeScene will use Repo to download your code. As your project evolves, CodeScene will keep your analyses in sync, adding and removing Git repositories as necessary.
Using Repo introduces several important differences in how CodeScene works.
Overall approach
When using Repo with CodeScene, your project is controlled through the manifest file. CodeScene synchronizes your project before every analysis, so any changes to your manifest are automatically and immediately taken into account.
CodeScene supports branch selection in your manifest repository. You can select different branches to checkout different versions of your project.
Creating a project with Repo
Repo must be installed on your local machine. If necessary, you can indicate the name of the Repo executable in the CodeScene configuration.
To create your project, go to the “New Project” page, and choose “Google Repo”. You will be presented with the following options:
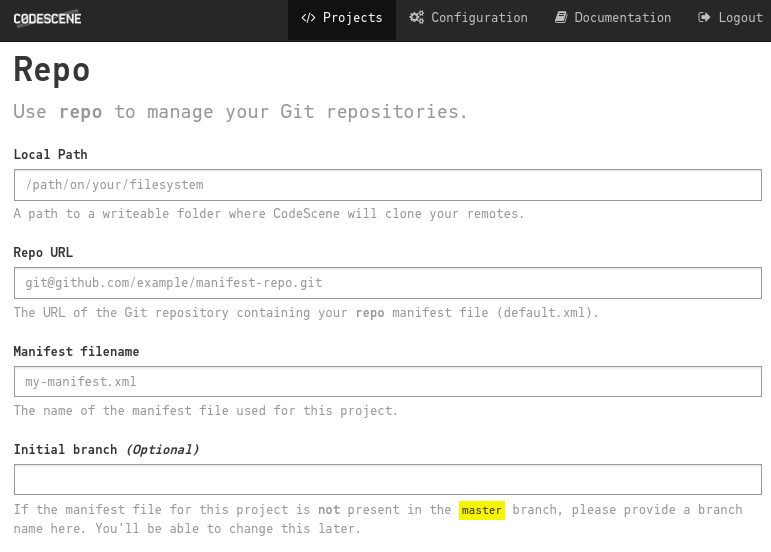
Fig. 202 Getting started with Repo
Local path indicates where the new Repo directory will be installed. If the directory does not exist, CodeScene will try to create it.
Repo URL is the URL of your repo manifest Git repository. This value
will be used in calls to repo init -u <URL> and should be in the
format indicated:
git@github.com/myorg/my-manifests.git
Note that this value cannot be changed later. To change to a new manifest repository, you’ll need to create a new project.
Manifest filename is the name of the manifest you’ll use. This field is required even if your manifest is default.xml. Like the Repo URL, this cannot be changed without creating a new project.
Initial branch only needs to be filled out if the manifest file you wish to use is not available in the master branch of your manifest repository. This allows CodeScene to “see” your manifest in order to initialize your project.
When you click on “Initialize”, CodeScene will set up the Repo directory and download your manifest file. The next page allows you to check that the Git repos to be clone are correct, and to switch branches if necessary.
CodeScene will then clone your repositories. This may take a long time. When this step is complete, project creation follows the usual path.
Working with Repo-based projects
The primary difference with Repo-based projects is that things like repository selection and branching within Git repositories are handled through the manifest file, either by modifying it in your manifest repository or by switching between branches in CodeScene.
To analyze a specific state of your project, you can use either a branch specification in your manifest file
<project name="my-git-project" revision="dev" />
or a specific commit hash
<project name="my-git-project" revision="b507579809e5e5cffee5fd078e2cdae658733538" />
Once a project has been created, you can go to its configuration page
to select a new branch of the manifest repository. When you save your
changes, CodeScene will run repo init -b <branch> and repo
sync, which may take some time depending on the size of your
project. If you try to switch to a branch that does not contain a
version of your manifest file, CodeScene will issue a warning and
return you to the previous branch.
Please note that when new branches are added to your manifest repository, CodeScene will not detect them until repo init is run, either before an analysis or when selecting another branch.
Because of how Repo works, Active Branch analysis is not currently available for Repo-based projects.
With Repo, the inclusion of new Git projects does not go through the normal channels. As a result, CodeScene does not at this time automatically generate an Architectural Component for each Git repository. For the same reasons, and because by design the list of Git repositories in a project will evolve over time, CodeScene does not validate Architectural Components against the files present on the file system.
Duplicate project roots
Projects managed with repo tend to be large, containing many individual repositories, or projects, in repo’s vocabulary. Projects in repo have distinct filesystem paths (either in the name or the path attribute), which means that multiple individual projects can have the same name (the last part of the path), as long as their paths are different:
/path/to/a/project
/path/to/another/project
/etc/project
CodeScene uses project names, and not paths, to identify projects. And this means that conflicts are possible. CodeScene’s repo support is designed so that adding and removing projects from the manifest file does not require any user intervention. CodeScene just follows along. In some, usually rare, cases, CodeScene has to rename projects. This can be important when using Architectural Components, Exclusion Filters or Temporal Coupling Filters that rely on a repository’s project root.
To disambiguate project names in this scenario, CodeScene generates its own project names from the paths. The paths in the example above would result in the following repositories being used
path-to-a-project
path-to-another-project
etc-project
On project creation, when duplicate project roots are detected, CodeScene allows you to select your own names if you prefer.

Fig. 203 Renaming Repo projects to avoid name conflicts
Whether you choose your own names or use those suggested
automatically, these names will be preserved. In other words, if the
above paths are present on project creation, /etc/project will
always be mapped to etc-project, even if it is no longer a
duplicate, that is if the other repositories named project are
removed from the manifest file.
This behavior only applies to project creation. Later, the manifest file may evolve and new name conflicts may appear at any time, each time an analysis is run. In those cases, the automatically generated name will be used, and their persistence cannot be guaranteed.
For example, if these paths are added to the manifest:
/a/new-project
/another/new-project
they will automatically become a-new-project and
another-new-project. If one of them is removed, the other will
revert to its original name, ie. back to new-project.
In some even more rare cases, there can be a conflict between the
derived name of a duplicate project, like a-new-project and an
existing, non-duplicated project that just happens to have the same
name. In these cases, a-new-project will be renamed to
a-new-project-1 (or a-new-project-2 etc.).
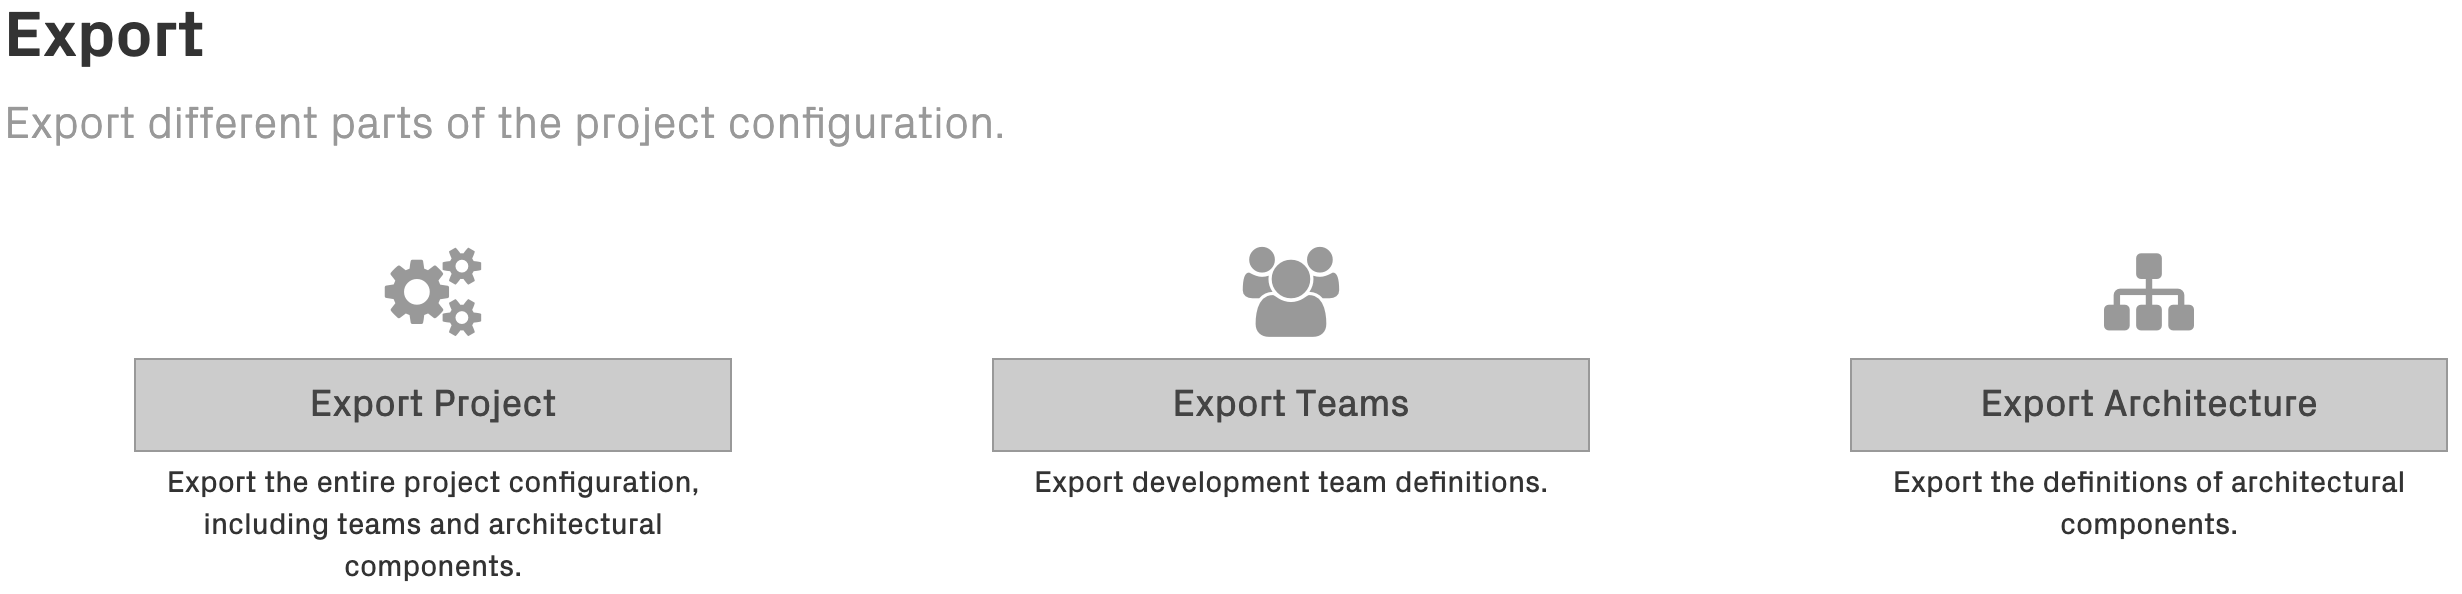
Exporting the project configuration
On the Export tab, the entire project configuration or parts of it can be exported to downloadable JSON and CSV files. This can be used for sharing the project configuration to another CodeScene instance, or for archiving projects before deletion.